What's New in 2.3.1-beta.2
There’s many new features in Drawpile 2.3.1-beta.2 over 2.3.0, but they are fully compatible with each other. You can draw with people on the older version all the same.
For ways to install it take a look at the release announcement or go to the beta section on the downloads page.
Below is a guide through the new features.
- Compatibility
- Project File Format (.dppr)
- Timelapses
- Project Playback
- Project Statistics
- Autorecovery
- Brush Stroke Previews
- Brush History
- Windows and Android Video Exports
- Animation Improvements
- Better Android Support
- Velocity-Adjusted Stabilizer
- Fan Fill
- Action Canvas Shortcuts
- More Touch Shortcuts
- Even More
Compatibility
Drawpile 2.3.1-beta.2 is fully compatible with Drawpile 2.3.0. The network protocol didn’t change, so you can draw together with people with any combination of these versions, you’ll just have some more features locally. It is also still backward-compatible with 2.2 versions all the same.
As far as file-formats go, Drawpile 2.3.0 can’t open .dppr files, but .dpcs and .ora files will work in either version. If you saved a .dppr file and want to open it in the older version, just open it and use File → Save As and choose a different format.
If you want to run the beta and stable versions side by side, take a look at this help page.
Project File Format (.dppr)
There is a new “project” file format with a .dppr extension, which is what the autorecovery feature is built on. These files contain both snapshots of the canvas and drawing commands for them. You must have autorecovery turned on to save the latter, otherwise the drawing commands don’t get recorded.
Having this extra information saved allows some other cool features, like being able to create timelapses of your drawing process, getting statistics on drawing time, autorecovery or restoring any earlier version of the picture.
If autorecovery is turned on, .dppr is the default format, since it retains the most information. You can configure the defaults under Edit → Preferences → Files and also pick which file format you want when saving. The .dpcs and .ora formats will give you smaller files, but then you won’t be able to make timelapses or get statistics, since they don’t save the necessary data.
The .ora format is not recommended anymore, since it’s much slower than the newer .dppr and .dpcs formats, usually has a larger file size than .dpcs and doesn’t have corruption repair. It still makes sense to export this way to edit the file in another program like Krita, but not for saving your canvas while you’re working on it.
Timelapses
If autorecovery is enabled and you save to .dppr files, you can create video of the drawing process of a picture. You may also know this under the (incorrect) term “speedpaint”.
To make a timelapse, use File → Make Timelapse. Here you can choose how long you want the video to run for, where or if you want a logo in the corner and a bunch of other settings. The advanced settings have a whole lot more knobs to twiddle, if you want to get into the details of those.
You can also crop the timelapse to only a part of the canvas. To do so, select the area you want to make a timelapse from and then use File → Make Timelapse.
The reason it exports so quickly is because the drawing there is really tiny and I’m using a fast video format! Larger pictures as well as formats with better compression and quality will take longer. Here is the resulting timelapse video:
Drawpile does not take “screenshots” of the canvas periodically, it records the (much smaller) drawing commands and plays them back to create the timelapse. That means there’s no settings for a capture interval or resolution anywhere like you might be used to from other programs. Making timelapses is not available in the web browser, only on the desktop and mobile versions.
If you’re making an animation, it will be played back at the start of the timelapse by default. Here’s an example of what that looks like, provided by BulletPepper.
Project Playback
You can “play back” project files via File → Open Player. This lets you watch the drawing process and jump to any point along the way.
This isn’t a video or something, it is the actual, full drawing process. You can use this to time-travel to any previous point in the session. You can go back to earlier versions of a project this way or get back layers that were accidentally merged or deleted.
If you try to open a dprec or dptxt recording file, you can choose whether to play them back directly or convert them to a dppr file. The latter also lets you stitch together multiple recordings into a single file to play back. The same dialog also lets you split and merge sessions from dppr files.
Project Statistics
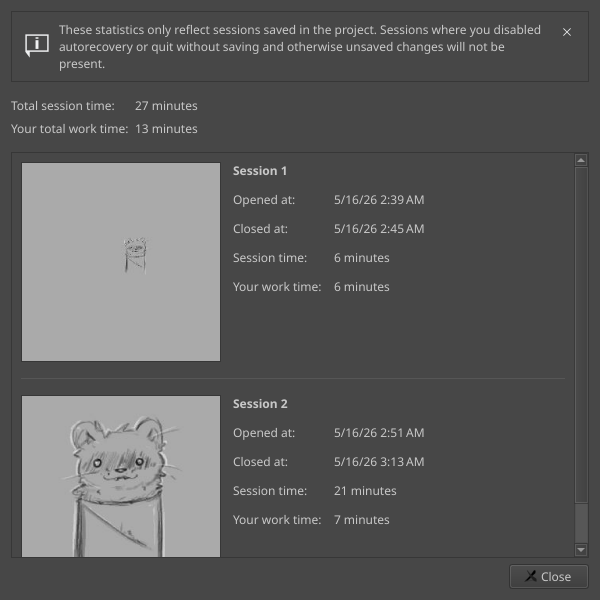
Also something that comes from autorecovery and saving to .dppr files is statistics for how long your sessions were and how long you actually spent drawing in them. These are available under File → Project Statistics.
More statistics would be technically possible, like how long you spent drawing on a certain cropped area of the canvas. However, unless there is demand for it or someone contributes it, I’ll probably hold off on putting work into implementing that, since there isn’t much point in showing numbers that no one needs.
Autorecovery
For a long time, Drawpile had an autosave mechanism that would essentially press the save button for you every few minutes. Well, it wasn’t very automatic, you had to turn it on for every file, but that’s what it was called. Like similar mechanisms in other programs, if Drawpile exited unexpectedly, your computer shut off or Android decided to terminate the application in the background, you lost anything unsaved.
It also has recordings, which is basically just saving the drawing commands that are received from the network (or yourself if drawing offline) to a file. This lets you restore pictures pretty much up to the instant where you left off and every past state leading up to it, which is great recovery mechanism. However, you also had to remember to activate this manually and the file format really isn’t made for fast recovery.
The new autorecovery feature takes the latter part and makes it actually automatic. The drawing commands get saved to a file automatically and if Drawpile exits unexpectedly, you can restore the canvas from there. On Android, if the system terminates Drawpile in the background, it will automatically resume the canvas. If you exit the program cleanly, you can choose to save or discard your canvas as before and the autorecovery file is discarded. To make restoring the canvas faster than replaying it from the beginning (and so that people looking for an “autosave interval” setting have something to twiddle) the autorecovery file also records snapshots every few minutes.
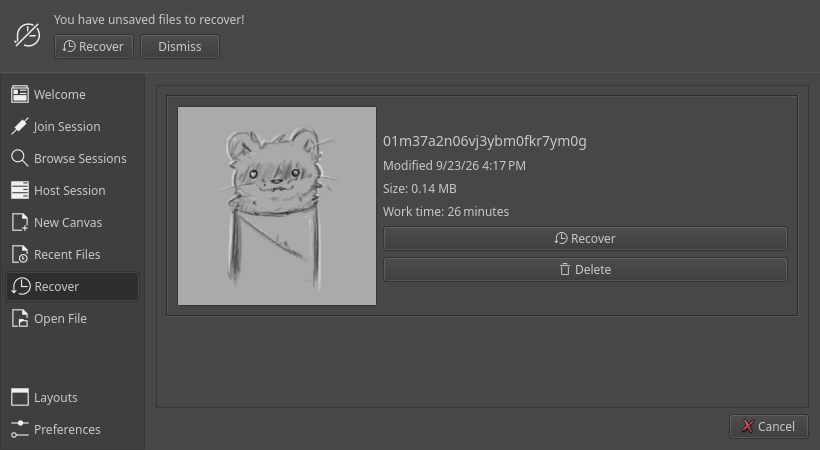
Drawpile will notify you on startup if there are files to recover. If they got corrupted somehow, you also get the option to repair them here.
On the mobile and desktop application, autorecovery is enabled by default. In the web browser it is not, since the “file” stays in memory and many devices don’t have much of that. You can see whether it’s turned on by the indicator in the bottom-right. If you click on that, you can also configure and toggle autorecovery for the current session.
To avoid these files ballooning to excessive sizes from idling in a session for days on end, there is also a limit on the file size that will first show you a warning when it reaches 75% of the limit and then automatically terminate the autorecovery if you don’t do anything about it.
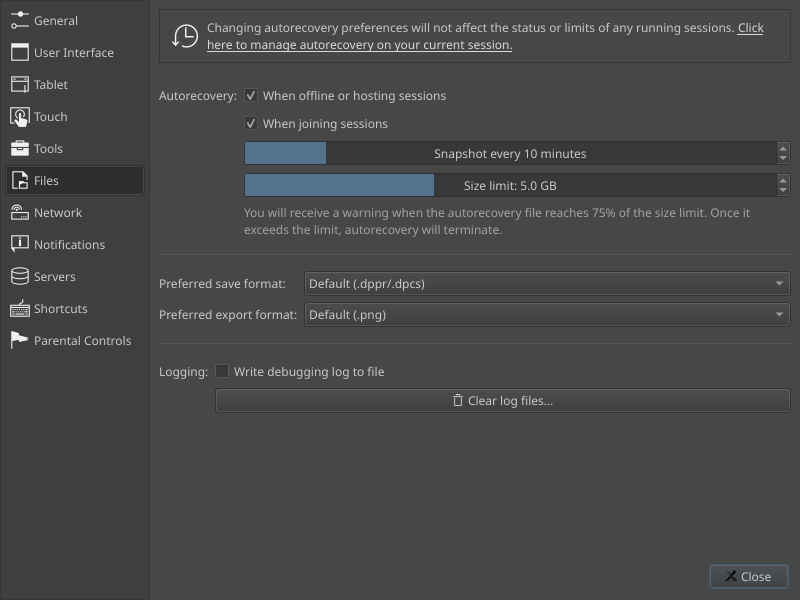
Under Edit → Preferences → Files, you can also configure how you want autorecovery to work by default. If you often join and idle in public sessions, it probably makes sense to disable autorecovery for those by default.
Brush Stroke Previews

Probably the thing you notice first when opening this version of Drawpile: the brushes dock now shows you previews for brush strokes and names for those brushes, rather than just thumbnails. This makes it much easier to find and identify them, which is why it’s now the default.
If you liked the compact, thumbnail-only way, you can go back to that using the menu at the top-left of the brushes dock. Here you can also change the size and turn off the thumbnails.

Relatedly, the preview in the tool dock now uses the same kind of “plain” preview of the brush. It’s less noisy and easier to grasp at a glance than the full rainbow dots one that tries to show you every single aspect of the brush at once. Again, if you liked that preview, you can go back to it through the menu at the top-left. Here you can also disable the preview altogether now, if you’d rather have the space for other stuff.
Brush History
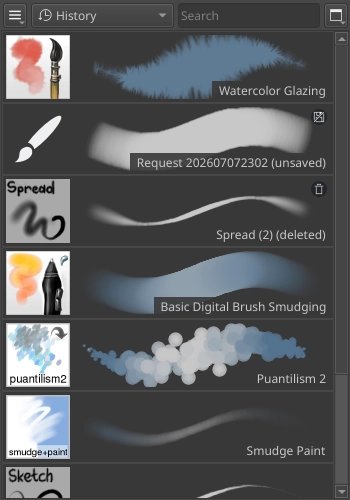
The brushes docker now has a “History” tag that keeps a list of recently used brushes in order of their use. If you accidentally switched away from a brush and don’t remember what it was, this lets you find it again.
It also holds onto brushes you deleted and brushes that you requested from other users and didn’t save. From here, you can restore deleted brushes or save these unsaved requested ones or of course get rid of them permanently. You can also clear the entire history to get rid of that data altogether.
Windows and Android Video Exports
On Windows an Android, Drawpile will now use video encoding facilities provided by the operating system. This is available when exporting animations and making timelapses.
Most importantly, his makes MP4/H.264 video available, which is the most compatible format and is set as the default. On Windows, you previously had to download FFmpeg to get access to this and on Android it just wasn’t available at all. Now they both work out of the box.
On Linux and macOS, you still have to use FFmpeg for this. However, it’s much easier to install on these systems, so it’s less of an issue to begin with.
Animation Improvements
You can now select multiple key frames in the animation timeline simultaneously. These can be dragged around, copied, cut, pasted and duplicated just like single key frames. You can select them either by holding Shift or Ctrl like you do in other controls or by using the new select tool at the top, which lets you do it without needing a keyboard.
Key frame exposure can also now be changed more comfortably by holding Alt or switching to the exposure tool in the timeline header. Clicking and dragging over the timeline lets you increase or decrease exposure on multiple tracks or on all tracks if you drag along the header.
When pasting key frames, you can now also choose to “declone” them. This will create new key frames on duplicated layers. You can also select one or more key frames and then declone their layers in place, which will make duplicates as needed.
Deleting a key frame now also deletes the layer it is associated with if there are no more references to it, rather than leaving it laying around. If you want to keep it, you can use the new “unassign key frame” action instead.
You can also zoom the timeline now, making the frames wider or narrower. You can do this via the magnifying glass button above the timeline or by holding Ctrl and spinning the mouse wheel.
Tracks can now be “move locked”, preventing you from accidentally reordering key frames. You can also use this to prevent exposure changes on tracks between other tracks that you do want to change the exposure on.
The animation timeline has been rearranged slightly to make better use of its space. The track buttons are now in the top-left of the timeline above the tracks, which previously was just emptiness.
The flipbook (the animation preview window) has also received some fixes so that it remembers your settings better and gained some more features. Under the ellipsis button, you can now reset the crop, frame range and speed. You can also set a speed value based on FPS, rather than having to manually twiddle the speed slider to the correct value.
To make working with looping animations easier, you can now set a “reverse” frame range, with the start value coming after the end. If you do this, the animation will skip the range in the middle, letting you work on the tail end of a loop it without having to wait for the entire thing to play through. These kinds of ranges also work on export, should you need that for some reason.
Animations can also be exported as PNG spritesheets now, Drawpile will automatically pick an optimal layout for them. If you have FFmpeg available, you can also export them as animated PNGs (APNG), which is necessary for some websites.
Better Android Support
There’s been several improvements to dealing with Android in general and some devices in specific. A lot of this work has been in collaboration with Krita and it has also gained several of these features in the process.

The thing you’ll probably notice right away is that Drawpile now asks you on startup how large you want your user interface to be and whether you want the desktop or mobile view. This lets you pick a size and style that is comfortable, rather than having to deal with blindly setting it and restarting the program like it worked before. By default, Drawpile will pick whatever your device says is its normal size, but you can adjust it from there. After you set it once, you can tell Drawpile to remember it on subsequent starts.
As already mentioned in the autorecovery section above, if Android terminates Drawpile in the background, it will now automatically resume the last autorecovery file the next time you start it. This is how Android expects applications to work, which is why it thinks it’s okay to just blow the application away without giving you a chance to save. If you are done with a canvas and don’t want to resume it, exit Drawpile cleanly by pressing the back button or by using File → Quit.
If you exhaust the resources of your device, Android will just exit Drawpile with no message at all, simply poofing it out of existence. Drawpile now detects if this happened and shows you a message explaining the situation when you start it again. This usually happens if you try to open a file or connect to a session that is too large for your device to handle.
Physical keyboard input should now work properly, which previously could act strangely depending on which keyboard application you had in use, like not allowing you to pan with the space bar until you started typing some text. On a few devices areas where text fields used could become cursed and stopped accepting stylus inputs, which is also fixed now. In some obscure configurations, Drawpile would turn blue if you pressed a physical keyboard key, which should also be fixed.
There is also support for barrel rotation now, for styluses that can do that. Drawpile is also built against Android 16 now, which makes no difference other than Google demanding it and showing a warning if it is not done. Older Android versions continue to be supported, as before.
Otherwise, there’s a whole bunch of special handling for devices that need the extra coddling. Three- and four-finger taps should now work on devices where the system always eats the inputs, like Xiaomi tablets. The presence of a stylus now requires proof of actually using it, since some devices lie about it and would leave you with touch drawing disabled because Drawpile thought you had a stylus at hand. Stylus buttons on some external tablets should now work properly, rather than requiring you to press the button and simultaneously put the stylus down. On Xiaomi devices, garbage stylus inputs that would make lines jaggy are ignored now, stylus buttons act as mouse buttons instead of page up/down keys and the pressure curve is set in a way where you don’t need screen-shattering force to reach 100%. On OnePlus devices, the stylus button now acts as a middle click by default. On Wacom MovinkPads, the third stylus button gets treated as mouse button 6, which toggles the eraser by default. On Ugee tablets, you should no longer get intermittent 100% pressure blotches. You can toggle some of these workarounds in the preferences, should they somehow interfere or you have a device that needs the same workarounds but isn’t already detected automatically.
Velocity-Adjusted Stabilizer
The stabilizer now gets reduced in intensity for faster strokes. This makes it so that the stroke doesn’t hang behind the cursor by a huge margin, instead following it in a reasonable distance. This should make it so that you have to fiddle with the stabilization slider significantly less.
You can change how the adjustment works via the input settings available in the menu next to the stabilizer slider or through Edit → Input Settings.
Fan Fill
The former lasso fill tool is now called the shape fill tool and has been given the choice between two shapes: lasso and fan.
Lasso works as before, with overlapping areas making holes like they do with a lasso selection. The fan shape always fills without holes, which is useful for quickly blocking out shapes,
Action Canvas Shortcuts
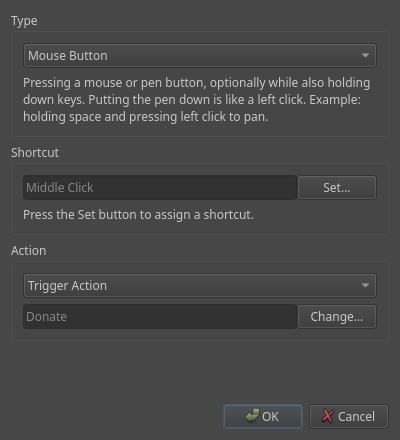
You can now assign any action you could assign to a keyboard shortcut to canvas shortcuts as well. This lets you assign them to mouse/stylus buttons, the mouse wheel etc.

The most common actions are pre-defined, like toggling the eraser, undo, redo or hiding docks. Everything else is available to pick through the “trigger action” option. This lets you assign just about anything, like switching tools, toggling mirroring or what ever else you want.
These settings are under Edit → Preferences → Shortcuts under the “Canvas” heading.
More Touch Shortcuts
Under Edit → Preferences → Touch, you can now assign a shortcut to double-tapping with one finger. There is also more options available now, such as mirroring the canvas. You can also choose “trigger action”, which works like described for canvas shortcuts above, letting you pick any action to activate.
These options are available for all the tap gestures, not just the double tap one.
Even More
If that’s not enough, there’s also plenty of smaller stuff:
- There’s now a rotation tool, analogous to the pan and zoom tools.
- Most numeric input fields can now be dragged over to adjust the value, making them easier to use with just a stylus.
- Curves in e.g. the brush editor now have numeric input fields to let set their points to precise values.
- You can now set the brush cursor to be totally blank, showing only the outline.
- File names now have a more sensible default that includes a date and session name if possible, rather than just the rather useless “Untitled”.
- The new and open buttons in the file toolbar have been replaced with a menu button that shows some more common file actions. It also gives you access to the menu, if the top bar is hard to hit on your device.
- The extents of rectangle selections are now shown in the status bar at the bottom.
- Custom color schemes no longer need to override existing ones, you can just drop new ones into the directory and they become selectable.
- Right-clicking with the freehand brush tool can now be assigned to draw with the background color or use the eraser.
- The Alt key is no longer captured by the menu bar and you can customize shortcuts like Alt+F to open its menus, which were previously not configurable.
- Holding the layer picking shortcut (Ctrl+Shift by default) now shows you the current layer on the cursor.
- A UDP activity stream under Tools → Developer Tools, which can be used to integrate with streaming avatars like Drawvatar.
- Canvas resizing is now much faster and uses far less memory.
- Drawpile now starts up quicker, the difference is especially large if you have a lot of brushes.
And that’s only the notable features, there’s also been numerous bugfixes and more performance improvements along the way.