Brush Settings
Drawpile has support for four kinds of brushes: round pixel, square pixel, soft round and MyPaint brushes. These can all be configured to give many kinds of different effects.
The brush settings dock and dialog let you configure an individual brush. You can also save and load brushes that you configured.
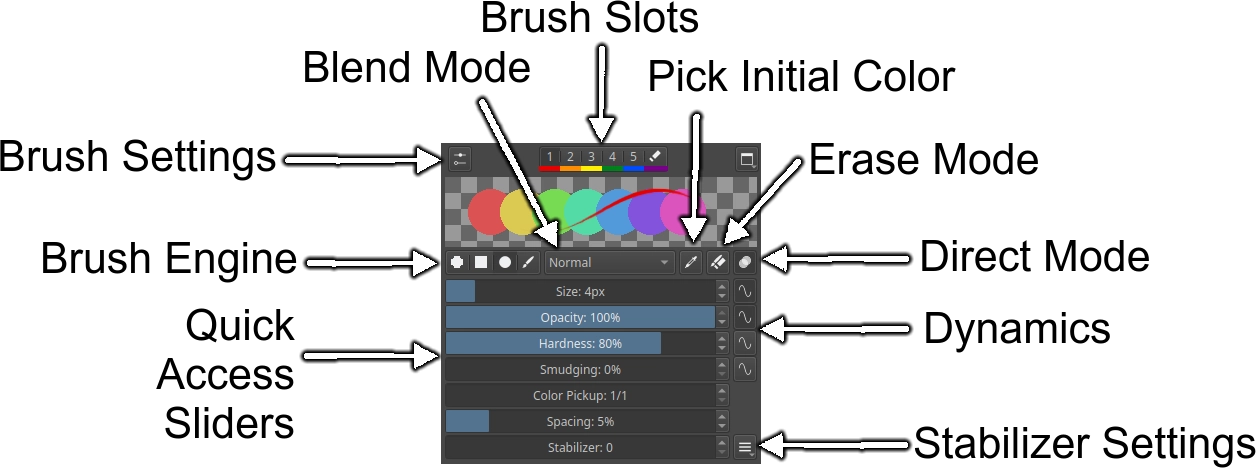
Brush Settings Dock
The brush settings dock is part of the Tool dock. They appear when you select a tool involving brushes, such as the brush, eraser or line tool. If you don’t see it, you can turn it on via View → Docks → Tool. If you don’t see it despite enabling it, it may be hidden behind another dock in a tab. On mobile and other small screen devices, it is behind the brush button at the top-left of the canvas.
Drawpile gives you up to 10 Brush Slots, with the last one reserved for an eraser. The default keyboard shortcuts are on the number keys. The idea is that you put the set of brushes you want to draw with into these slots and toggle between them, letting you pick a different set depending on which picture you’re working on. The default is to have 6 slots, you can configure the amount under Edit → Preferences, in the Tools tab.
The Reset button gets discards any changes you made to your brush and restores its original state. The default shortcut for this is Shift+P. There’s also the option to reset all slots or all brushes under the Brush Actions menu.
You can choose the Brush Engine, between round pixel, square pixel, soft and MyPaint brush. Different brush engines allow for different settings.
You can pick which Blend Mode you want to draw with. Most blend modes preserve alpha, see the help article on alpha lock for more information. MyPaint brushes do not have this option, instead they have a single button to toggle alpha lock mode.
The Pick Initial Color toggle makes brush pick up the color from the canvas where you put your pen down. This can be used to set up smudge brushes. MyPaint brushes don’t have this button, they have more intricate smudge controls in the brush settings dialog instead.
The Erase Mode toggle lets you switch the current brush to an eraser and back. This is how erasers work in Krita, for example.
The Direct Mode switches between direct and indirect mode. Direct mode will cause opacity to keep building up within an individual stroke, indirect mode will limit it within a single stroke instead. In Krita, these are called “build-up” and “wash” mode, respectively. Other software calls them “flow” and “opacity”.
The Quick Access Sliders let you configure the most common brush settings. The Dynamics toggles turn on or off brush dynamics for those settings. Which sliders are visible depends on the brush engine, MyPaint brushes have more intricate dynamics controls in the brush settings dialog instead.
The Stabilizer Settings let you configure your brush stabilizer. See the article on stabilization for more information.
Clicking on the Brush Actions drop-down button at the top-left gives you further options for resetting, saving and categorizing the brush. There’s also a link to the brush settings dialog that lets you edit brushes in more detail.
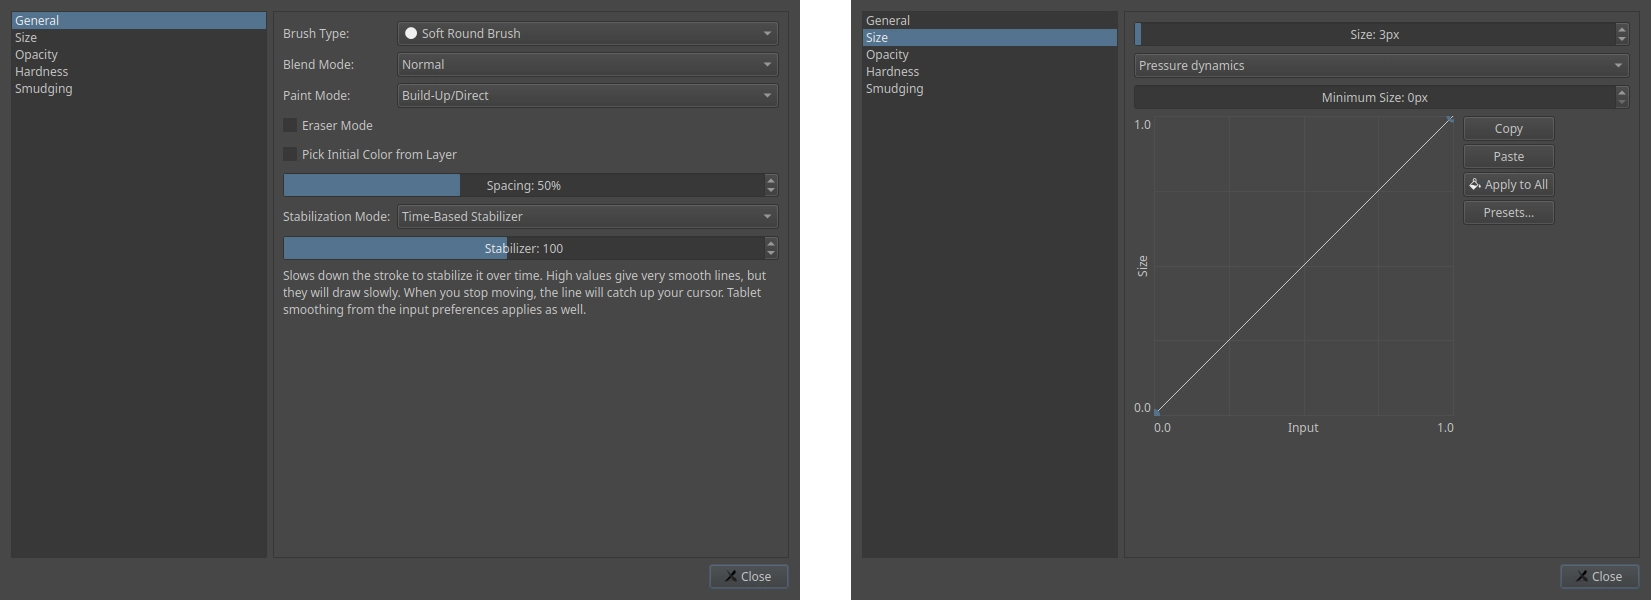
Brush Settings Dialog
This dialog is accessible via Edit → Brush Settings or using the button at the top-left of the brush settings dock.
You can choose the setting you want to edit in the list on the left. The individual pages like Size or Opacity let you configure the maximum and minimum value, as well as which dynamics to use. Pressure dynamics will use pen pressure, velocity dynamics will use the speed at which you’re drawing and distance dynamics use the length of your stroke. No dynamics turns off the dynamics and always uses the maximum value. For velocity and distance dynamics, you also get a slider to choose how fast or how far the maximum value should go.
The curve below lets you adjust how the dynamics affect the value. On the X axis, 0.0 is the weakest pressure, slowest speed or smallest distance, 1.0 is the strongest, fastest or largest. On the Y axis, 0.0 is the minimum value, 1.0 is the maximum value. You can Copy and Paste curves; they are copied as text, so you can share them in chat too. Apply to All will apply the chosen curve to all of Size, Opacity, Hardness and Smudging. Under Presets, you can save and load curves.
Configuring MyPaint brushes looks different and is more involved. Take a look at the dedicated article on configuring MyPaint brush settings.
Changing a brush will remember the settings. You can reset the brush to get the original state back. To keep the settings as a new baseline, save it as a new brush or overwrite an existing one, see the brush presets section below.
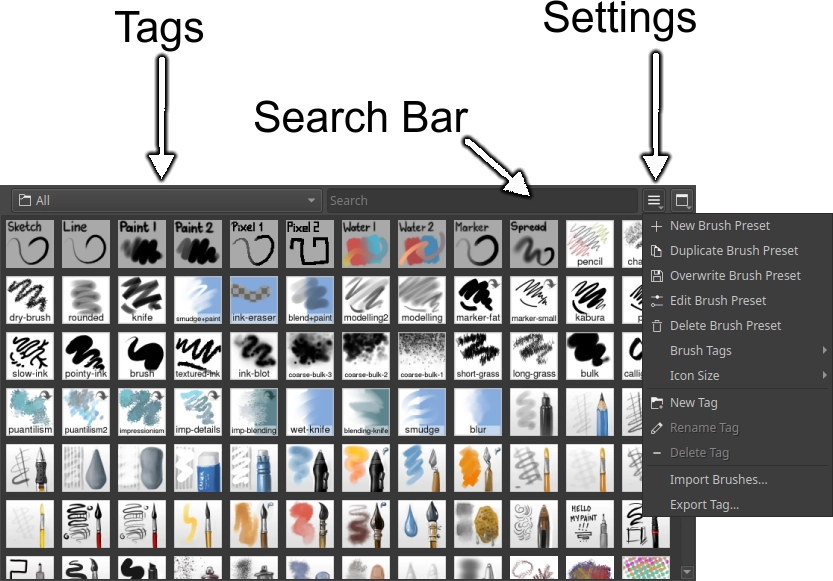
Brush Presets
Brushes can be found in the Brushes dock. If you don’t see it, you can turn it on via View → Docks → Brushes. If you don’t see it despite enabling it, it may be hidden behind another dock in a tab. On mobile and other small screen devices, it is behind the brush button at the top-left of the canvas.
In this dock, you can choose brushes by clicking on them. Doing so will change the brush in your current slot to the chosen preset. You can also assign shortcuts to presets directly under Edit → Preferences, in the Shortcuts tab under Brushes.
The Tags drop-down lets you show only presets from the chosen tag, rather than having the whole list available. The Search Bar lets you look for brushes by name.
You can create your own tags and assign brushes to them under the Settings button. Here you can also create, duplicate, overwrite, edit and delete brush presets, as well as picking the icon size. Many people create some kind of “Favorites” tag and put the brushes they like best in there.
There’s also shortcuts for imports and exports here, see the help article on brush sharing for more information.
Brushes are always sorted by name. The default brushes all have a numeric prefix to keep them ordered. If you want to reorder your brushes, edit their names accordingly.
Slot Attachment
As of Drawpile 2.2.2, brushes you choose get attached to a slot by default. This will make changes to the brush settings get stored in the brush itself until you reset it.
If you don’t like this behavior, you can disable it by going into Edit → Preferences, in the Tools tab and turning off “attach selected brushes”. This will keep modifications only inside the slots and won’t modify the brush itself. Picking a different brush will lose the changes you made.
You can also detach an individual brush from a slot by clicking on the brush actions menu at the top-left of the brush settings dock and choosing Detach.
When you take a brush from another person in your session, you’ll also receive a detached brush. If you want to keep those settings, you have to save them.