Running Public Sessions
When hosting a session that is open to the public, the threat of griefers coming in and making a mess of everyone’s work is very real. While there is no technical solution to completely fix this problem, Drawpile does have some tools that help.
Permission Tiers
Users in a Drawpile session can have the following permission tiers, from highest to lowest:
- Operators (“ops”) are the owners of a session. They can reset it, change its settings, assign permissions to users, kick and ban people, as well as just about anything else within that single session.
- Trusted is a status granted by operators. They don’t have any inherent permissions, but can be granted the ability to kick and ban people by operators.
- Registered users have an account, either on the server or on an external service connected to it (most commonly drawpile.net.)
- Guests are users without an account and who haven’t been granted any further permissions. They can access features and layers set to be accessible by “Everyone”.
There is also the special role of Moderators (“mods”), which own the entire server. They always count as Operators in every session.
Users with an account will retain their Operator and Trusted permissions when they leave and later rejoin. You can modify the permissions of offline users through Session → Settings, in the Roles tab. Here you can also export these roles and import them into later sessions so that you don’t have to re-op and re-trust folks again.
Session Permissions
You can modify a session’s permissions under Session → Settings, in the Permissions tab. Here you can decide which permission tier is allowed to access which features.
The default permissions are fine for private sessions, but for public sessions, you may want to restrict them further. In particular:
- Own Layer Editing should be restricted to Operators or Trusted, since otherwise users may create an excess amount of layers.
- Consider restricting Cut, Paste & Fill and MyPaint Brushes to Trusted only, since they can be used to cover large parts of the canvas or slow down other users.
- Restrict the Timeline permission to Operators if you don’t want to allow animation. If you do, consider restricting it to Trusted users only, since timeline tracks and frames don’t have finer-grained permission controls.
You can save and load presets for permission sets you use frequently.
Layer Permissions
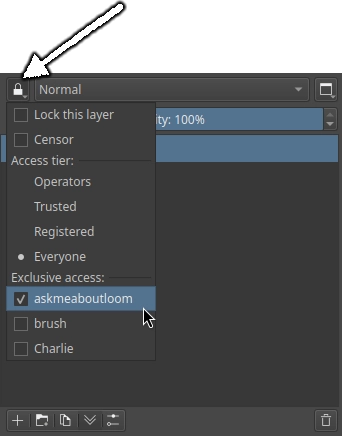
You can modify the permissions of a layer by clicking on the lock button at the top-left corner of the layer dock.
Locking a layer will prevent anyone from modifying its settings or contents.
Censoring a layer will make its contents turn into striped tiles unless the user enables View → Show Censored Layers. You can use this to have sessions with mixed content. The parental control preferences also let you disable the ability to show censored layers.
Setting an access tier will restrict a layer to users of that tier and above. Giving exclusive access to a layer will also restrict it to only the chosen users.
Note: At the time of writing, settings on layer groups do not get inherited by layers inside it, they have to be set on every layer individually. If you want to set permissions on a lot of layers at once, you can use the Bulk Permission Commands.
Operator Password
By default, operator status is given to the user that hosts a session and anyone that they or a moderator grants this permission to.
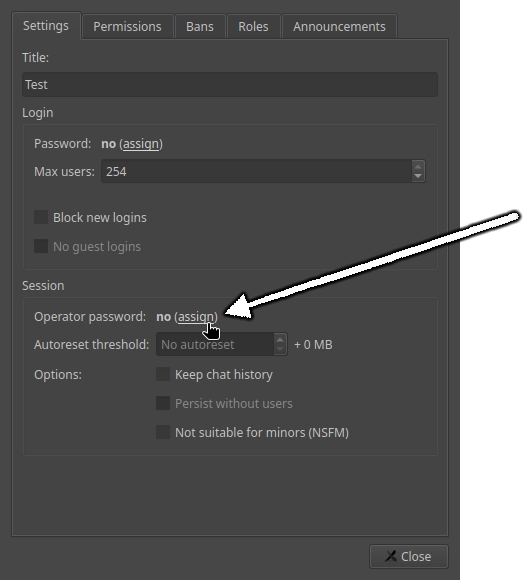
You can also set an operator password on a session through Session → Settings, in the Settings tab, under the Session group. When set, you can use Session → Moderation → Become Operator to type in this password and become an Operator. This is useful if you don’t have a registered account, but still want to be able to have a long-running session where you can remain Operator in.
Orphaned Sessions
Sessions can end up without any Operators if:
- The last Operator leaves.
- And there is no Operator password set.
- And there is no users with a registered account that have Operator permissions.
Since there would be no way for anyone to become Operator anymore without a Moderator intervening, the server will give the longest-standing user in the session Operator permissions as a failsafe.
If you don’t want this to happen, assign an Operator Password for the session or use a registered account.
Protecting Annotations
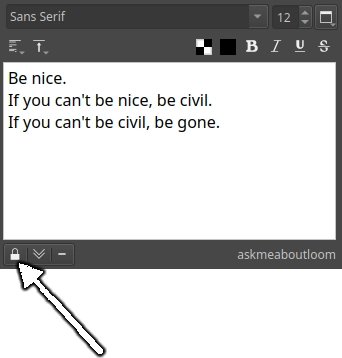
You can protect annotations from modifications by clicking on the lock icon at the bottom of the annotation settings. This will prevent anyone except the creator of the annotation and Operators to modify this annotation.
You can use this for things like session rules or similar. Depending on how strict you want to be, you may also want to restrict the New Annotations Session Permission, to prevent users from creating additional annotations that could add words to the rules or cover them up.
Locking and Force Undo
You can prevent users from making modifications on the canvas by right-clicking on them in the user list next to the chat or clicking on the three dots next to their name there and picking the Lock User option. Unlocking them works the same way.
You can use the same menu to force undo and redo their actions, which is useful if they e.g. deleted something maliciously or accidentally that you want to get back.
Locked users can still use the laser pointer (if they have that permission) and write messages into the chat.
Kick and Ban
You can kick and ban users through the user list next to the chat. The list of banned users can be viewed under Session → Settings, under the Bans tab.
If the server supports it, you can also export session bans here. These bans are encrypted by default and can only be imported again on the same server.
Moderators can export bans in an unencrypted format.
Canvas Lock and Reset
Operators can perform a manual session reset through Session → Reset. In this dialog, you can use the slider at the bottom to go back to a prior state.
If something goes really wrong, you can lock the entire canvas (default hotkey is F12) to prevent any further modification to it and then return to a prior state this way.
You can adjust how many reset snapshots Drawpile is supposed to keep and in which intervals it’s supposed to take them in the application Preferences, in the General tab under the Canvas snapshots section. Note that on Android and in the browser, snapshots are disabled by default due to memory pressure.
Bulk Permission Commands
As of Drawpile 2.2.1, there exist some commands to edit permissions in bulk. These are mostly intended to fix up sessions that didn’t assign proper permissions in the first place and so have ended up in a mess. These are commands that you type into the chat and then send like a regular message.
An argument in [brackets] is optional. Arguments separated|by|vertical|bars represent alternative options, of which you need to give one.
/modhelpwill show help about these commands./trust-all-userswill assign the Trusted tier to all connected users that aren’t already Trusted or above./untrust-all-userswill remove the Trusted tier from all connected users that have it.-
/set-layer-acl-tiers [raise] [exclusive] all|current everyone|registered|trusted|operatorswill change the permission tier ofalllayers or thecurrently selected one and anything below it. Ifraiseis given, this will only increase the tiers of layers, but not reduce them. This won’t modify layers with exclusive access set unlessexclusiveis given.Since that’s pretty complicated, here’s some examples:
/set-layer-acl-tiers all operatorssets all layers that don’t have exclusive access set to be operator-only./set-layer-acl-tiers raise current trustedwill raise all layers under the currently selected one to trusted, but won’t reduce any operator-only layers and won’t change layers that have exclusive access./set-layer-acl-tiers all exclusive everyonewill set all layer tiers to everyone, including any with exclusive access.