Animation
Drawpile lets you animate, coming with a timeline, onion skins and a flipbook to preview your animations with. It works similar to other animation programs, but there’s some conceptual differences to allow for multiple animations and drawings to coexist peacefully on the same canvas.
Note: Almost all actions on the timeline have keyboard shortcuts. Since they are different depending on your operating system, the default shortcuts aren’t listed in this documentation, but the menu actions will show what combination they are assigned to next to them. You can change the key bindings in Drawpile’s preferences.
Quick Start
Here’s a quick rundown on how to get started animating. Later sections will go into more detail.
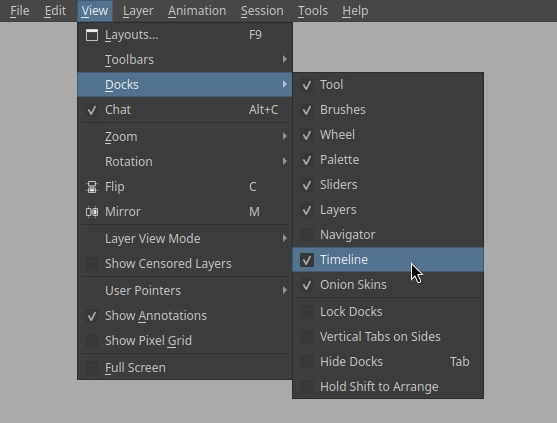
Step 1: Make the timeline dock visible. In desktop mode, you can do this by enabling View → Docks → Timeline. If you’re on a phone, tablet or other small-screen device, press the bottom-left button on the canvas that shows a stopwatch symbol. If you don’t see the timeline even after enabling it, it may be hidden behind another dock in a tab.
Step 2: Switch to frame view. You can do this with the button in the timeline (see below) or through View → Layer View Mode → Frame View.
Step 3: Create a track. Either press the button in the timeline that shows a plus symbol (see below) or through or through Animation → New Track.
Step 4: Create a layer group to hold your frames. Either press on the button in the layer dock or through Layer → New Layer Group. This isn’t strictly necessary, but it’s much better for organization and lets you reduce the opacity of this group if you’re using it as a sketch.
Step 5: Create a key frame. Either press the button on the timeline that shows a stopwatch with a plus symbol (see below) or through Animation → Create Layer on Key Frame → Create Layer on Current Key Frame. Now you can draw on it.
Step 6: Create more key frames by picking another spot in the timeline and repeating the previous step. To add backgrounds or otherwise layer something on top or below, create more tracks and arrange them appropriately.
Step 7: To enable onion skins, click on the lightbulb next to the track name (see below) or through Animation → Track Onion Skin.
Step 8: To view your animation in motion, press on the play button in the timeline (see below) or through Animation → Flipbook.

Concept
Animations in Drawpile are made by viewing the layers on the canvas in a different arrangement. A timeline frame is built up by stacking the layers of the currently visible key frames of each timeline track on top of each other. Only layers assigned to frames participate in this, other drawings on the same canvas don’t interfere with the animation.
Key frames can be assigned to a layer, a layer group or nothing at all. You can assign the same layer or layer group to multiple key frames, so if you’re making a back and forth loop, you can re-use the same layers. If they’re assigned to a layer group, you can also filter which layers are visible inside of those, letting you re-use the same layer structure for multiple frames.
The flipbook for viewing animations allows you to crop the area you’re viewing, restrict the range of frames played back and adjust the speed of the playback. This way, you can have multiple independent animations on the same canvas, which each can use a subset of the timeline.
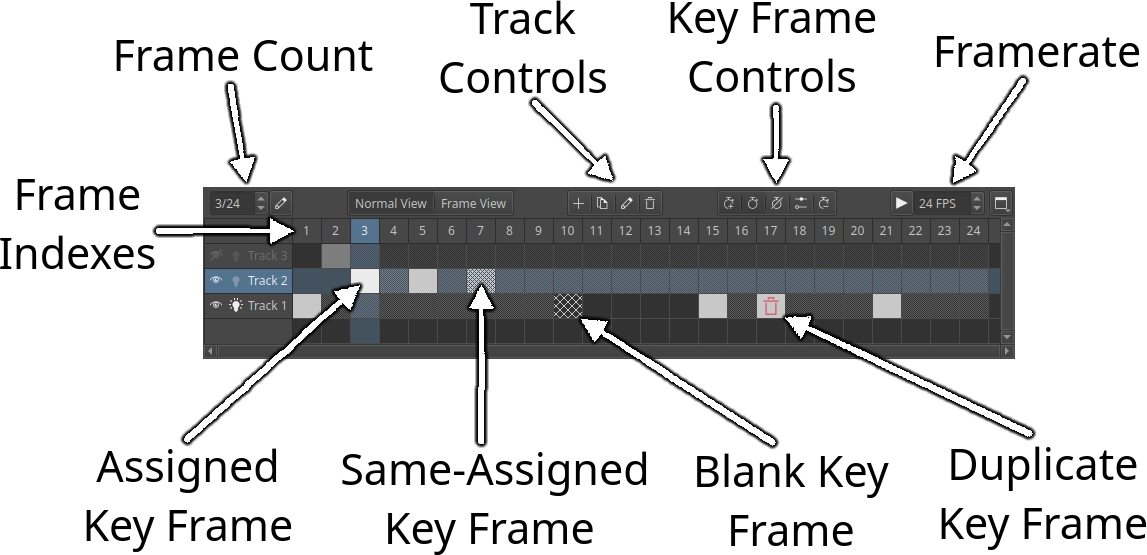
Timeline
The Frame Count is shown in the top-left corner of the timeline. You can edit it by clicking on the pen icon next to it or by through Animation → Change Frame Count. Frames can’t go beyond the end of the timeline, so you should set this to a large enough value so that everyone on the canvas has enough room to animate. You can always reduce the range of frames being played back, see the Flipbook section below.
As a shortcut, you can switch between Normal View and Frame View using the buttons on the timeline. Alternatively, these options are also available through View → Layer View Mode.
The Track Controls let you create, duplicate, rename and delete timeline tracks. These actions are also available in the Animation menu or by right-clicking on a track. Refer to the Tracks section below.
The Key Frame Controls let you create a layer on the current key frame, set the current key frame to the selected layer, blank out the current key frame, show key frame properties and remove a key frame. These actions are also available in the Animation menu or by right-clicking on a key frame. Refer to the Key Frames section below.
The Framerate says how fast the animation plays back by default and lets you adjust this value. You can modify the playback speed from this default, see the Flipbook section below.
You can click and hold on the Frame Indexes to “scrub” the timeline, letting you get a quick preview of a section of your animation without busting out the flipbook.
Key Frames
Key frames can be assigned to layers, layer groups or be blank. The timeline shows them in a few different ways (refer to the image above):
- A solid rectangle means that the key frame is assigned to a layer or layer group.
- A dotted rectangle means that the key frame is assigned to the same layer or layer group as the current key frame, with the same visibilities (see below.) That means if you modify the layers of the current frame, that other frame will also be modified.
- A rectangle with a fence-like diamond pattern on it is a blank key frame, not assigned to any layer.
- A rectangle with a red trashcan on it is a pointless duplicate. It’s assigned to the same stuff as the key frame before it, meaning that you can just delete it and your animation won’t look any different.
You can drag key frames around to move them. If you drag them with the middle mouse button, you will create a copy, without duplicating the layer or layer group they are assigned to. To duplicate them and the assigned layer or layer group, use Animation → Duplicate Key Frame → Duplicate to Next Key Frame or Duplicate to Previous Key Frame.
To increase the length of a frame, use Animation → Increase Frame Exposure. To reduce it, use Animation → Decrease Frame Exposure. This will move all subsequent frames forward or backward accordingly.
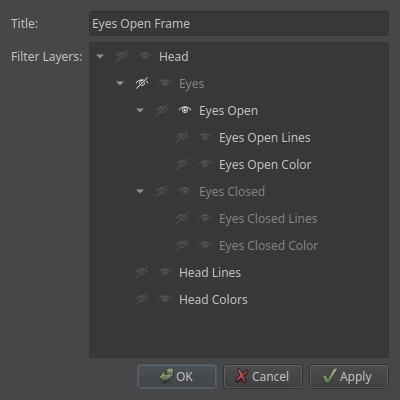
You can edit a key frame’s properties by double-clicking on it or through Animation → Key Frame Properties.
Here you can give the key frame a title, which will be shown when you hover over it in the timeline.
You can also filter which layers are visible in the frame. This is only useful if you assign a layer group to a key frame, when you assign a single layer, there’s not much to filter. You can hide a layer and everything underneath it by enabling the crossed-out eye icon. If you enable the open eye icon on a layer underneath it, those layers will in turn become visible again, even if their parent was hidden.
In the example image below, the drawing of a head was assigned to the key frame. They eyes were hidden and the open eyes were shown, meaning that on this frame, you will see the head with its eyes open. This kind of setup is useful for blinking eyes, different mouth shapes and the like, where you want to keep the same layer structure and only modify things inside it.
Tracks
Timeline tracks are layered on top of each other to build the animation’s frames. They are similar to another layer stack, but specific to animations.
You can hide and show a track by clicking on the eye icon on the left or through Animation → Track Visible. This only changes the visibility for you, not for everyone else in the session.
You can toggle the onion skins on a track using the lightbulb icon next to the name or through Animation → Track Onion Skin. This also only applies to you, not everyone else. For how to edit your onion skins settings, see the Onion Skins section below.
Tracks can be rearranged by dragging them.
Onion Skins
You can enable onion skins on a timeline track using the lightbulb icon next to the name or through Animation → Track Onion Skin.
You can change your onion skin settings using the Onion Skins dock. In desktop mode, you can show it through View → Docks → Onion Skins. If you’re on a phone, tablet or other small-screen device, press the bottom-left button on the canvas that shows a stopwatch symbol.
If you don’t see the onion skins dock even after enabling it, it may be behind another dock (probably the timeline) in a tab.
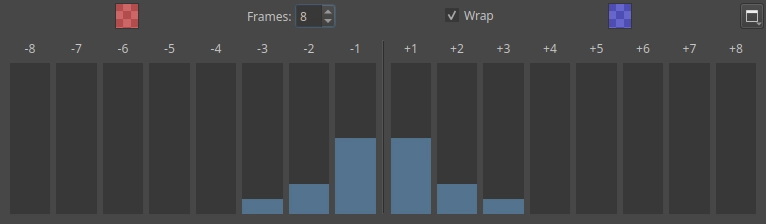
You can adjust the opacity of each onion skin by dragging the sliders up and down. Previous key frames are on the left, next key frames on the right. You can adjust how many frames are visible in the dock by altering the Frames counter at the top.
To change the onion skin colors, click on colored squares at the top left and right.
The Wrap checkbox toggles if the onion skins should wrap around the timeline or not. This is useful if you’re making an animation loop.
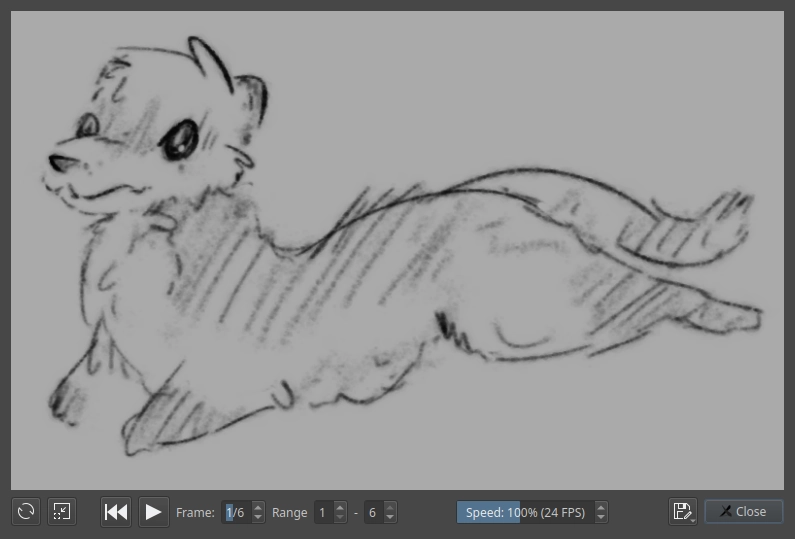
Flipbook
The flipbook is how you view an animation in motion, letting you adjust which part of the canvas and timeline you want to view, as well as how fast you want to play it back. You can also export what you’re seeing.
You can open the flipbook dialog by clicking on the play button in the timeline or through Animation → Flipbook.
If you select an area before doing this, the flipbook will be cropped to that region of the canvas right away. Alternatively, you can click and drag on the flipbook preview to crop out a rectangle of the canvas there. Clicking it again or hitting the Reset Zoom button that shows up at the bottom-left will show the whole canvas again.
To refresh the flipbook while it’s open, either click on the play button in the timeline or activate Animation → Flipbook again, or press the Refresh button at the bottom-left of the flipbook dialog.
You use the buttons at the bottom to play/pause and rewind the playback. The Frame field shows you which frame you are currently on.
The Range fields let you decide which part of the timeline you want to view, the Speed slider lets you adjust how fast it plays back. If there are multiple animations on the canvas, you can adjust the range and speed differently for each one, keeping the global timeline settings fixed.
The Export at the bottom-right lets you save what you are seeing. Refer to the Export section below for more details.
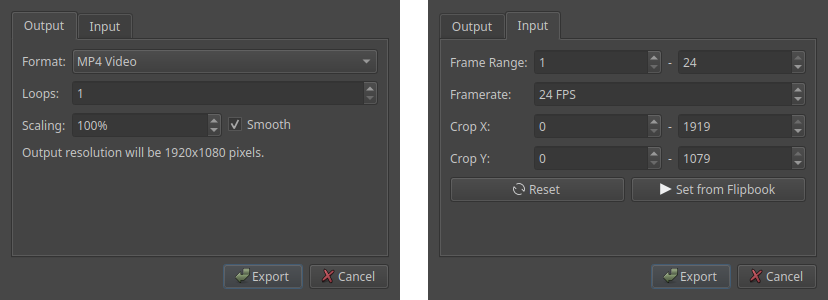
Export
You can export the entire canvas as an animation using File → Export → Export Animation. You can also press the Export button at the bottom right of the flipbook, see the Flipbook section above. Both of these will give you the animation export dialog.
In the Output tab of this dialog, you can pick which format you want to export. The scaling option lets you resize the output. You’ll probably want to keep it under 2000 pixels in either dimension, since otherwise mobile devices will often either refuse to play your animation or chug when doing so. With the smooth checkbox you can pick between smooth bilinear or hard nearest-neighbor scaling. If you’re exporting an animation with hard pixel edges, you’ll probably want to turn this off, but in most cases you’ll probably want it enabled. If you’re exporting to a video format, you can also choose how many types to loop it.
The following formats can be exported to, availability depends on the platform.
- Frames as PNGs will export the animation frames as separate PNG images, which you can then import into a video editor or other software for post-processing.
- Frames as PNGs in ZIP is the same, except all the farmes will be in a ZIP file. This is the only option available in the web browser.
- Animated GIF is an old animated image format. It only supports up to 256 colors and 1 bit alpha. Files are usually very large. However, the format is pretty ubiquitous and for small animations it’s usually fine.
- Animated WEBP is a newer animated image format, with full color support and small file sizes. It’s not supported everywhere yet though.
- MP4 video is a video format that should work just about everywhere and has reasonable quality and size.
- WEBM video is a newer video format with smaller file sizes, but not supported everywhere.
In the Input tab, you can configure which parts of the canvas you want to put into your animation. The reset button will make it encompass the entire canvas with the timeline’s full frame range and default framerate. The set from flipbook button will instead use the range, framerate and crop area as you’re previewing it in the flipbook.
Importing Animations
You can import animations either from a set of separate files or from the layers of an ORA or PSD file using File → Import → Import Animation.
The Frames tab is for importing separate frame images. You can add files and sort them here. The Layers tab is to import a single ORA or PSD file, whose layers get turned into timeline frames. That is also how you import animations from older versions of Drawpile.
The key frame length decides how many frames each imported file or layer should be held. A value of 1 means the frames will be placed adjacent to each other in the timeline, 2 means they’ll be spaced with an empty frame between them and so on.
