MyPaint Brush Settings
This article was largely contributed by Blozzom.
MyPaint is a procedural brush engine from the program with the same name. You should probably read the article on brush settings first, since ome of the knowledge in that article might be needed before proceeding.
For terminology, the MyPaint engine takes inputs, such as the pressure or speed of your pen, and turns them into outputs, like size or opacity of the brush stroke. The stroke is made out of individual dabs, which are circular or elliptical shapes that get stamped onto the canvas.
- Dynamic Inputs
- Inputs
- Parameters
- Opacity
- Opacity multiply
- Opacity linearize
- Radius
- Hardness
- Pixel feather
- Dabs per basic radius
- Dabs per actual radius
- Dabs per second
- Radius by random
- Fine speed filter
- Gross speed filte
- Fine speed gamma
- Gross speed gamma
- Jitter
- Offset by speed
- Offset by speed filter
- Tracking noise
- Slow tracking per dab
- Change color hue
- Change color lightness (HSL)
- Change color satur. (HSL)
- Change color value (HSV)
- Change color satur. (HSV)
- Smudge
- Smudge length
- Smudge radius
- Eraser
- Stroke threshold
- Stroke duration
- Stroke hold time
- Custom input
- Custom input filter
- Elliptical dab: ratio
- Elliptical dab: angle
- Lock alpha
- Colorize
- Snap to pixel
- GridMap Scale
- GridMap Scale X
- GridMap Scale Y
- Smudge length multiplier
- Smudge bucket
- Smudge transparency
- Offset Y
- Offset X
- Angular Offset: Direction
- Angular Offset: Ascension
- Angular Offset: View
- Angular Offset Mirrored: Direction
- Angular Offset Mirrored: Ascension
- Angular Offset Mirrored: View
- Angular Offset Adjustment
- Offsets Multiplier
- Posteriz
- Posterization Level
- Information on Setting Groups
Dynamic Inputs
Dynamic Inputs are a way for MyPaint engine to get information of the external devices as a drawing tablet or mouse; for instance the pressure over the drawing tablet, the speed of pen movement, the pen tilt, its location on a grid, zoom level etc. Some Dynamic Inputs are tied to brush parameters/brush settings, such as Base Brush Radius.
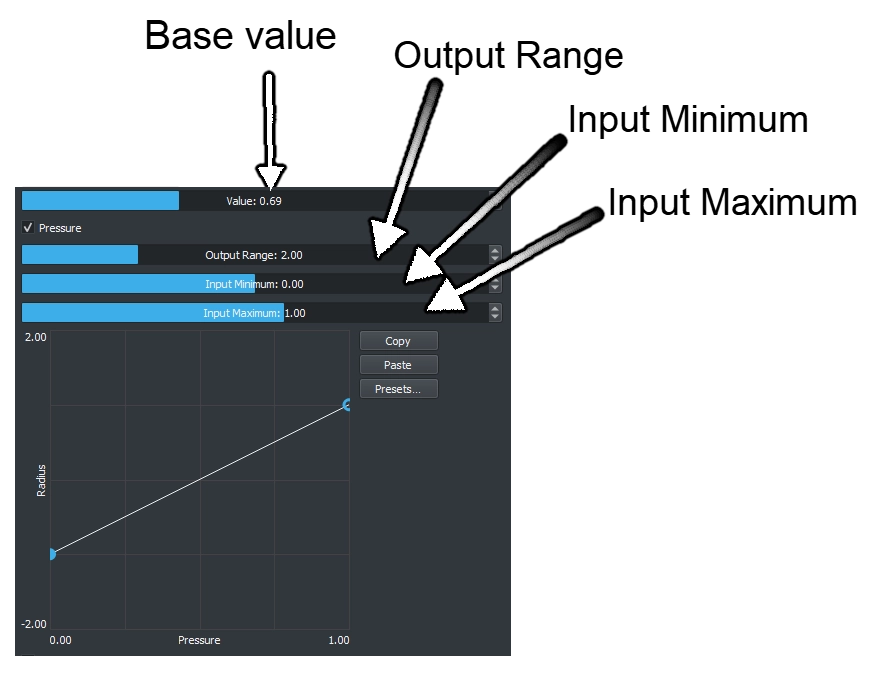
Curves
You can find a more in-depth explanation the article on brush settings. Each dynamic input has an input curve you can edit, this input curve alters the value of parameter/brush setting. Drawpile brushes have Input Minimum with their input curves. Mypaint brushes differ in that they have Output Range, Input Minimum, and Input Maximum. You can right click to get more precise on the sliders.
The base value is the base value of the brush setting. Sometimes it’s unique that it affects more than one thing such as in radius it will both affect the radius of each dab and the offsets.
Drawpile comes with 4 curves saved you can use, but you can make and save your own curves. Something like a staircase-like curve can be useful, depending on what effect you want to achieve. Take a look at how other
Grouping
You can roughly group inputs in the following categories.
- Tied to stylus
- Tied to brush parameters and stylus
- Other
Inputs and Parameters
List of Dynamics that incorporate brush Parameters and what they’re tied to:
- Pressure
- Pressure gain
- Fine speed
- Fine speed filter
- Fine speed gamma
- Gross speed
- Gross speed filter
- Gross speed gamma
- Direction
- Direction filter
- Direction 360
- Direction filter
- Stroke
- Stroke threshold
- Stroke duration
- Stroke hold time
- Custom
- Custom input
- Custom input filter
- GridMap X
- GridMap Scale
- GridMap Scale X
- GridMap Y
- GridMap Scale
- GridMap Scale Y
- Base Brush Radius
- Radius
Inputs
Pressure
The pressure reported by the tablet. Usually between 0.0 and 1.0, but it may get larger when a pressure gain is used. If you use the mouse, it will be 0.5 when a button is pressed and 0.0 otherwise.
Since usually your pressure starts low and ends low you can have a pressure curve that drops or increases at the start then stays in the middle to affect the value in the beginning and end of your drawing strokes.
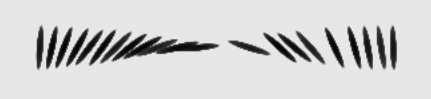
Fine speed
How fast you currently move. This can change very quickly. Try ‘print input values’ from the ‘help’ menu to get a feeling for the range; negative values are rare but possible for very low speed.
Dieterle brushes do make use of this input to prevent lag by not drawing at all if you’re moving too fast. On drawpile though your brush shouldn’t lag at all. Whether you’re moving slow or fast. Those are the markings of a bad brush.
Gross speed
Same as fine speed, but changes slower. Also look at the ‘gross speed filter’ setting.
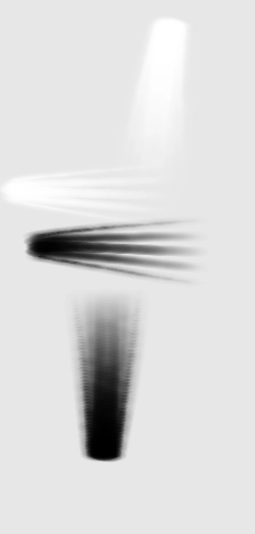
Usually Gross speed starts with a high effect then lowers. Which can be useful if you’re looking for a brush that starts strong and then becomes weaker. A flash light brush or mushroom/tree brush etc. Where you want it to stop drawing after a bit, or have it have an effect at the start etc.
Random
Fast random noise, changing at each evaluation. Evenly distributed between 0 and 1.
It’s not really random, it’s like a stroke dynamic with no duration. Dabs look random but they’re all in the same spots in the curve. If radius is increased around the beginning of the curve to be bigger, and you go and add another curve to color also affecting the beginning of the curve, you’ll find that the same exact dabs are affected.
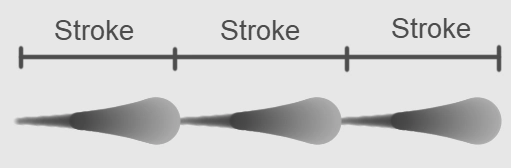
Stroke
This input slowly goes from zero to one while you draw a stroke. It can also be configured to jump back to zero periodically while you move. Look at the stroke duration and stroke hold time settings.
You can think of strokes as a number that gets higher when you draw and repeats when it reaches its end.
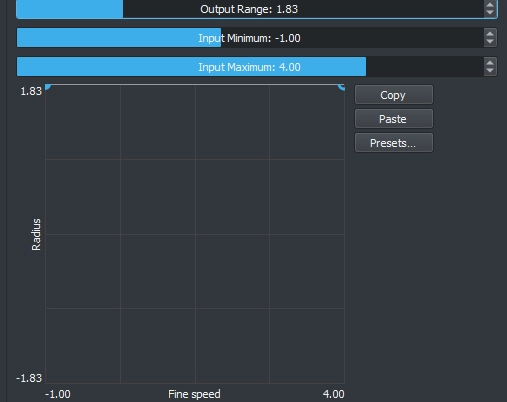
Direction
the angle of the stroke, in degrees. The value will stay between 0.0 and 180.0, effectively ignoring turns of 180 degrees.
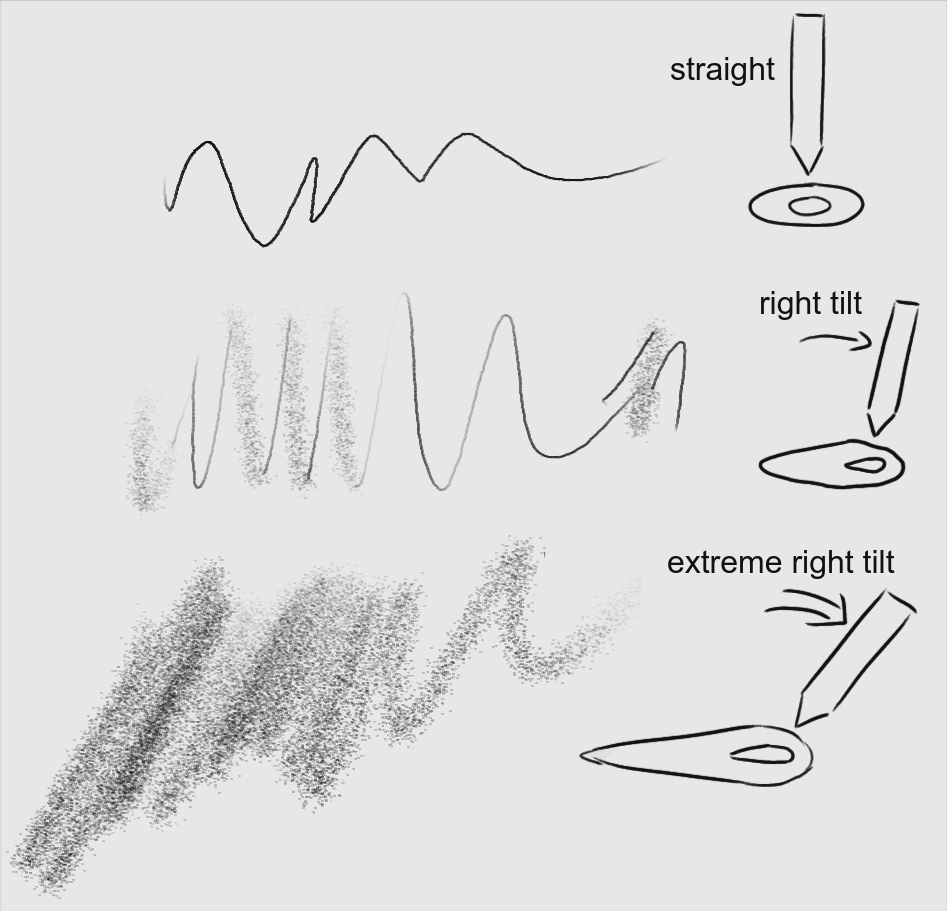
Declination/Tilt
Declination of stylus tilt, if your tablet supports it. 0 when stylus is parallel to tablet and 90.0 when it’s perpendicular to tablet. Barrel Rotation and Rotation won’t affect Declination/Tilt.
Useful if you’re looking to make a realistic pencil that can be used for shading when you tilt your pen.
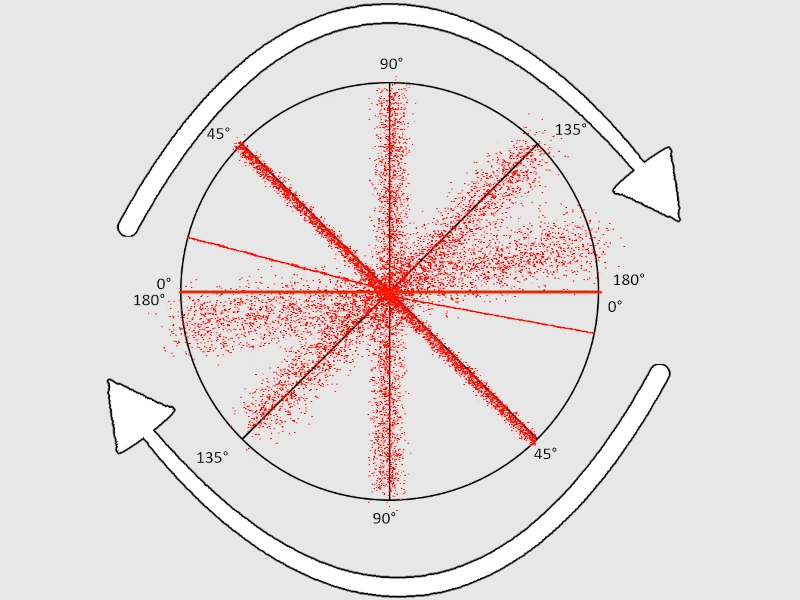
Ascension
Right ascension of stylus tilt. 0 when the stylus working end points to you, +90 when rotated 90 degrees clockwise, -90 when rotated 90 degrees counterclockwise.
Custom
This is a user defined input. Look at the custom input setting for details.
Direction 360
The angle of the stroke, from 0 to 360 degrees.

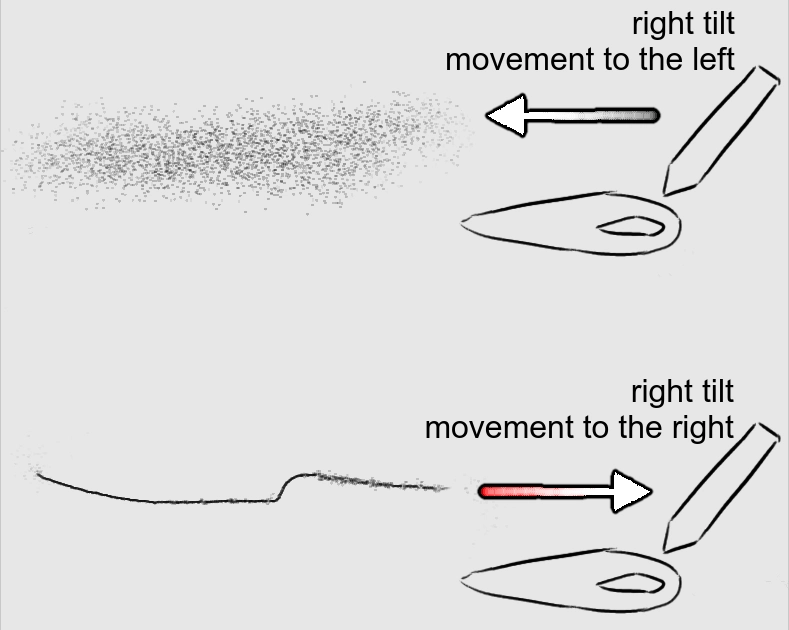
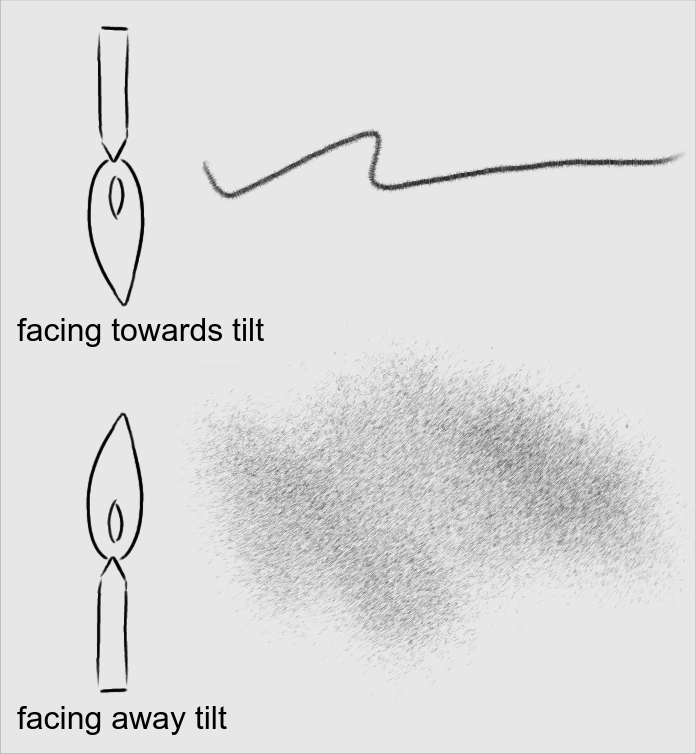
Attack Angle
The difference, in degrees, between the angle the stylus is pointing and the angle of the stroke movement.
The range is +/-180.0. 0.0 means the stroke angle corresponds to the angle of the stylus. 90 means the stroke angle is perpendicular to the angle of the stylus. 180 means the angle of the stroke is directly opposite the angle of the stylus by the tablet.
Default linear curve:
Declination/Tilt X
Declination of stylus tilt on X-Axis. 90/-90 when stylus is parallel to tablet and 0 when it’s perpendicular to tablet.
Default linear curve:

Declination/Tilt Y
Analogous to the above, just in the Y axis.
Default linear curve:
GridMap X
The X coordinate on a 256 pixel grid. This will wrap around 0-256 as the cursor is moved on the X axis. Similar to “Stroke”. Can be used to add paper texture by modifying opacity, etc.
The brush size should be considerably smaller than the grid scale for best results.
You can change the size of the grid with GridMap Scale and GridMap Scale X.
GridMap Y
Analogous to the above, just in the Y axis.
You can change the size of the grid with GridMap Scale and GridMap Scale Y
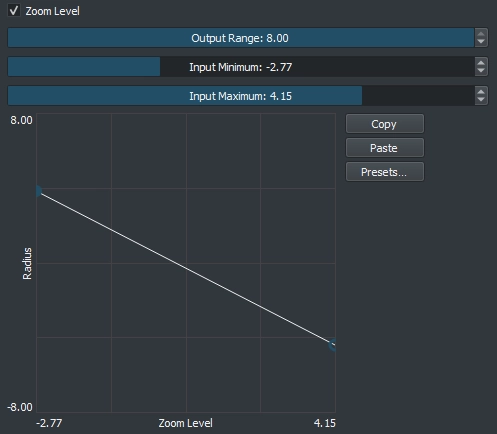
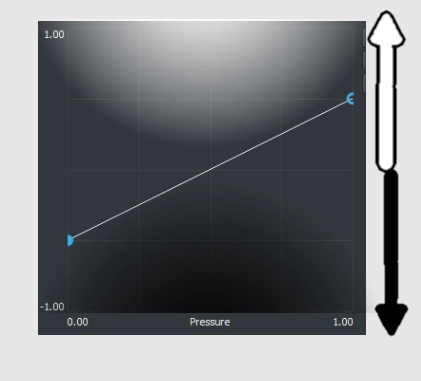
Zoom Level
The current zoom level of the canvas view. This is logarithmic: 0.0 is 100%, 0.69 is 200%, -1.38 is 25%.
For the Radius setting, using a value of -4.15 makes the brush size roughly constant, relative to the level of zoom.
Can be used if you want a brush that its size stays consistent, no matter the zoom like the ones in some vector drawing programs. To do that, set the curve like this:
Barrel Rotation
Rotation of the stylus, if supported by your tablet. This is how the pen is twisted around its own axis.
0 when not twisted, +90 when twisted clockwise 90 degrees -90 when twisted counterclockwise 90 degrees….
Base Brush Radius
The base brush radius allows you to change the behavior of a brush as you make it bigger or smaller.
Parameters
There are a lot of parameters and it can get overwhelming, but you can get a bit more of an overview by grouping them:
- Basic
- Inputs
- Dabs
- Tracking
- Smudge
- Color
- Offset
- Masks
Opacity
0 means brush is transparent, 1 fully visible (also known as alpha)
Opacity multiply
This gets multiplied with opacity . You should only change the pressure input of this setting. Use opacity instead to make opacity depend on speed.
This setting is responsible for stopping painting when there is zero pressure. This is just a convention, the behaviour is identical to opacity.
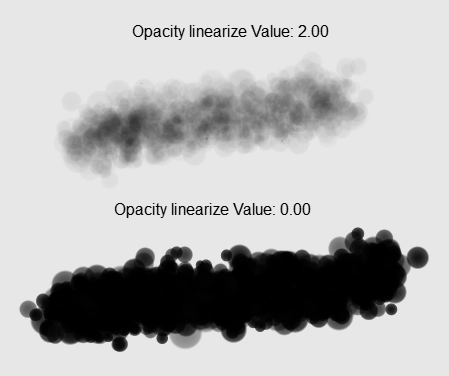
Opacity linearize
Correct the nonlinearity introduced by blending multiple dabs on top of each other. This correction should get you a linear (“natural”) pressure response when pressure is mapped to opacity multiply, as it is usually done. 0.9 is good for standard strokes, set it smaller if your brush scatters a lot, or higher if you use dabs per second.
0.0 the opacity value above is for the individual dabs.
1.0 the opacity value above is for the final brush stroke, assuming each pixel gets ((dabs per radius) * 2) brush dabs on average during a stroke.
Radius
Basic brush radius, on a logarithmic scale.
0.7 means 2 pixels, 3.0 means 20 pixels.
Hardness
Hard brush-circle borders (setting to zero will draw nothing). To reach the maximum hardness, you need to disable pixel feather.
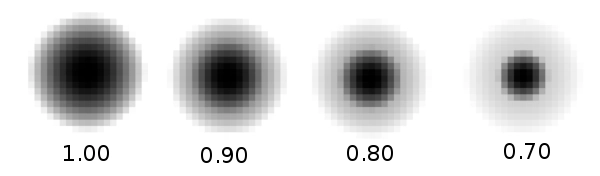
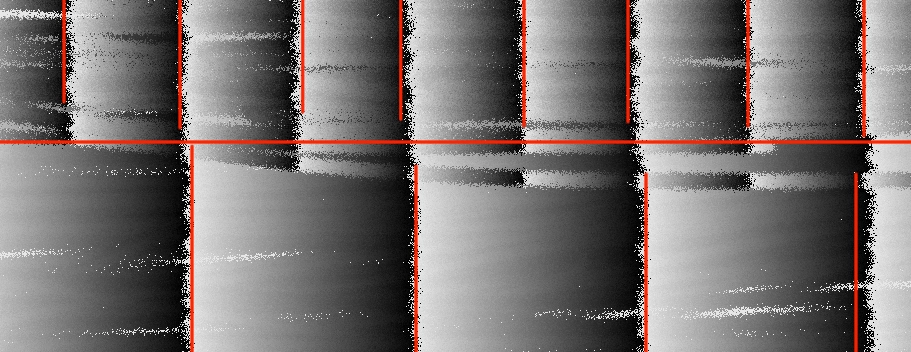
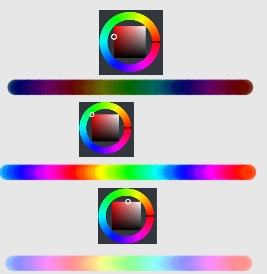
Pixel feather
This setting decreases the hardness when necessary to prevent a pixel staircase effect (aliasing) by making the dab more blurred.
0.0 disable (for very strong erasers and pixel brushes)
1.0 blur one pixel (good value)
5.0 notable blur, thin strokes will disappear
![]()
Dabs per basic radius
How many dabs to draw while the pointer moves a distance of one brush radius (more precise: the base value of the radius).
A higher value leads to a denser stroke, low values end up with disconnected dabs.
Dabs per actual radius
Same as above, but the radius actually drawn is used, which can change dynamically
Dabs per second
Dabs to draw each second, no matter how far the pointer moves
Radius by random
Alter the radius randomly each dab. You can also do this with the random input on the radius setting. If you do it here, there are two differences: the opacity value will be corrected such that a big-radius dabs is more transparent and will not change the actual radius seen by dabs per actual radius.
Fine speed filter
How slow the input fine speed is following the real speed.
0.0 makes it change immediately as your speed changes.
Gross speed filte
Analogous to the fine speed filter, but note that the range is different.
Fine speed gamma
This changes the reaction of the fine speed input to extreme physical speed. You will see the difference best if fine speed is mapped to the radius.
At -8.0 very fast speed does not increase fine speed much more.
At +8.0 very fast speed increases fine speed’ a lot.
For very slow speed the opposite happens.
Gross speed gamma
Analogous to fine speed gamma for gross speed.
Jitter
Add a random offset to the position where each dab is drawn.
At 0.0 or less it’s disabled.
At 1.0 standard deviation is one basic radius away.
Offset by speed
Change position depending on pointer speed
0 disables, > 0 draws where the pointer moves to, < 0 draws where the pointer comes from.
Offset by speed filter
How slow the offset goes back to zero when the cursor stops moving.
Tracking noise
Add randomness to the mouse pointer, similar to jitter, but to the input positions. This usually generates many small lines in random directions.
Slow tracking per dab
Slow down pointer tracking speed. 0 disables it, higher values remove more jitter in cursor movements. Useful for drawing smooth, comic-like outlines.
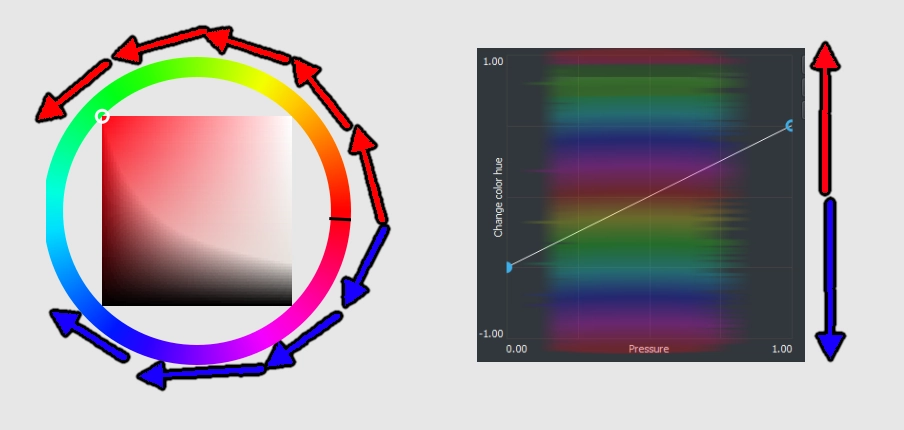
Change color hue
Changes the hue of the resulting color.
-0.1 small clockwise color hue shift, 0.0 does nothing, 0.5 counter-clockwise hue shift by 180 degrees.
Change color lightness (HSL)
Change the color lightness using the HSL color model.
-1.0 makes it blacker, 0.0 does nothing, 1.0 makes it whiter.
Change color satur. (HSL)
Change the color saturation using the HSL color model.
1.0 makes it less saturated, 0.0 does nothing, 1.0 makes it more saturated.
Change color value (HSV)
Change the color value (brightness, intensity) using the HSV color model. HSV changes are applied before HSL.
-1.0 makes it darker, 0.0 does nothing, 1.0 makes it brigher.
Change color satur. (HSV)
Change the color saturation using the HSV color model. HSV changes are applied before HSL.
-1.0 makes it less staturated, 0.0 does nothing, 1.0 makes it more saturated.
Smudge
Paint with the smudge color instead of the brush color. The smudge color is slowly changed to the color you are painting on.
0.0 does not use the smudge color.
0.5 mixes the smudge color with the brush color.
1.0 uses only the smudge color.
Smudge length
This controls how fast the smudge color becomes the color you are painting on.
0.0 immediately updates the smudge color (requires more CPU cycles because of the frequent color checks).
0.5 changes the smudge color steadily towards the canvas color.
1.0 never changes the smudge color.
Smudge radius
This modifies the radius of the circle where color is picked up for smudging.
0.0 uses the brush radius.
-0.7 half the brush radius (fast, but not always intuitive).
+0.7 twice the brush radius.
+1.6 five times the brush radius (slow performance).
Eraser
How much this tool behaves like an eraser
0.0 normal painting, 1.0 standard eraser, 0.5 causes pixels go towards 50% transparency.
Stroke threshold
How much pressure is needed to start the stroke input. This isn’t referring to the brush stroke itself, that will always start when you put your pen down.
Stroke duration
How far you have to move until the stroke input reaches 1.0. This value is logarithmic (negative values will not invert the process).
Stroke hold time
This defines how long the stroke input stays at 1.0. After that it will reset to 0.0 and start growing again, even if the stroke is not yet finished.
2.0 means twice as long as it takes to go from 0.0 to 1.0.
9.9 or higher stands for infinite.

Custom input
Set the custom input to this value. If it is slowed down, move it towards this value (see below). The idea is that you make this input depend on a mixture of pressure/speed/whatever, and then make other settings depend on this ‘custom input’ instead of repeating this combination everywhere you need it.
If you make it change by random you can generate a slow (smooth) random input.
Custom input filter
How slow the custom input actually follows the desired value (the one above). This happens at brushdab level (ignoring how much time has passed, if brush dabs do not depend on time).
0.0 means no slowdown (changes apply instantly).
Elliptical dab: ratio
Aspect ratio of the dabs; must be >= 1.0, where 1.0 means a perfectly round dab.
Elliptical dab: angle
Angle by which elliptical dabs are tilted.
0.0 means horizontal dabs, 45.0 is 45 degrees, turned clockwise, 180.0 is horizontal again.
Lock alpha
Do not modify the alpha channel of the layer (paint only where there is paint already, aka “Recolor”).
0.0 is normal painting.
0.5 half of the paint gets applied normally.
1.0 means the alpha channel is fully locked.
Colorize
Colorize the target layer, setting its hue and saturation from the active brush color while retaining its value and alpha.
0.0 is normal painting, 1.0 means to only colorize, something in between means the dab is partially applied in each mode.
Snap to pixel
Snap brush dab’s center and its radius to pixels. Set this to 1.0 for a thin pixel brush.
GridMap Scale
Changes the overall scale that the GridMap brush input operates on. This is logarithmic, on the same scale as the brush radius.
A scale of 0 will make the grid 256x256 pixels.
GridMap Scale X
Changes the scale that the GridMap brush input operates on. Affects the X axis only.
The range is 0-5x. This allows you to stretch or compress the GridMap pattern.
GridMap Scale Y
Analogous to the above in the Y direction.
Smudge length multiplier
Logarithmic multiplier for the “Smudge length” value. Useful to correct for high-definition/large brushes with lots of dabs.
The longer the smudge length the more a color will spread and will also boost performance dramatically, as the canvas is sampled less often
Smudge bucket
There are 256 buckets that each can hold a color picked up from the canvas. You can control which bucket to use to improve variability and realism of the brush.
Especially useful with the “Custom input” setting to correlate buckets with other settings such as offsets.
Smudge transparency
Control how much transparency is picked up and smudged, similar to lock alpha.
1.0 will not move any transparency, 0.5 will move only 50% transparency and above, 0.0 will have no effect.
Negative values do the reverse
Offset Y
Moves the dabs up or down based on canvas coordinates.
Offset X
Moves the dabs left or right based on canvas coordinates.
Angular Offset: Direction
Follows the stroke direction to offset the dabs to one side.
The higher the value, the more it will move to one side of the cursor. negative values for the opposite side, angular line rotating with directional movement.
Angular Offset: Ascension
Follows the tilt direction to offset the dabs to one side. Requires tilt.
The higher the value, the more it will move to one side of the cursor, negative values for the opposite side, angular line rotating with pens ascension.
Angular Offset: View
Follows the view orientation to offset the dabs to one side.
Higher value, the more it will move to one side of the cursor, negative values for the opposite side.
Angular Offset Mirrored: Direction
Follows the stroke direction to offset the dabs, but to both sides of the stroke.
The higher the value, the more it will move from each side of the cursor, angular line rotating with directional movement.
Angular Offset Mirrored: Ascension
*Follows the tilt direction to offset the dabs, but to both sides of the stroke. Requires tilt.
The higher the value, the more it will move from each side of the cursor, angular line rotating with Ascension.
Angular Offset Mirrored: View
Follows the view orientation to offset the dabs, but to both sides of the stroke.
The higher the value, the more it will move from each side of the cursor.
Angular Offset Adjustment
Change the Angular Offset angle from the default, which is 90 degrees.
Offsets Multiplier
Logarithmic multiplier for X, Y, and Angular Offset settings.
Posteriz
Strength of posterization, reducing number of colors based on the “Posterization levels” setting, while retaining alpha.
Posterization Level
Number of posterization levels (divided by 100).
0.05 = 5 levels, 0.2 = 20 levels, etc.
Values above 0.5 may not be noticeable.
Information on Setting Groups
Basic General Opacity Opacity multiply Opacity linearize Radius Hardness Pixel feather Radius by random Snap to pixel Elliptical dab: ratio Elliptical dab: angle
Radius: base value affects both offsets and the Radius of dabs. If you want to affect only the radius you can use dynamic inputs which will only affect the radius and not the offsets.
You can use Elliptical dab: angle with dynamic input Direction or Direction 360 to have the direction of your dabs match the direction of your drawing. You can then change the base value for if you want them horizontal or vertical.
Inputs
- Speed
- Fine speed filter
- Gross speed filter
- Fine speed gamma
- Gross speed gamma
- Custom
- Custom input
- Custom input filter
- Basic
- Direction filter
- Pressure gain
- Grid Map
- GridMap Scale
- GridMap Scale X
- GridMap Scale Y
- Stroke
- Stroke threshold
- Stroke duration
- Stroke hold time
If you’re using a mouse: Pressure gain is useful to change the pressure of your brush. Speed gammas are useful if you want all your speed inputs to be stronger. Filters are useful if you want your inputs to be weaker under conditions or just generally.
GridMap will track where pixels are placed but offsets don’t get tracked on where they are actually placed. only where they are supposed to be i.e where the pointer is. Tracking noise is not an offset so works fine.
- Dabs
- Dabs per basic radius
- Dabs per actual radius
- Dabs per second
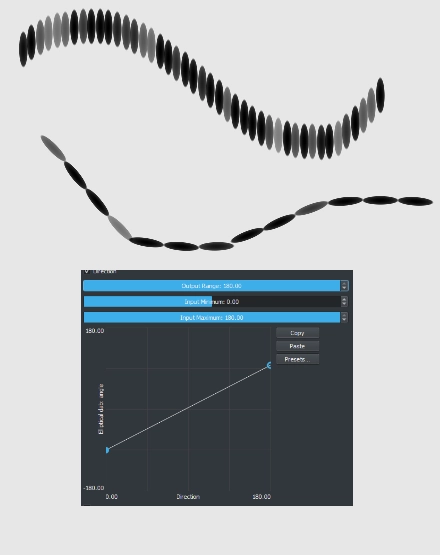
The amount of dabs that you place as you draw is very important. Especially if you’re not drawing alone, Dabs per basic radius and Dabs per actual radius both have a collective limit of 20. Meaning if DPBR is 12 and DPAR is 13 they actually just have a value of 20. Dabs per second can have any value. Changing the ratio can add more dabs as well.
Usually you should only use one, not both. Which one is better for your brush is up to experimentation. High values can cause chugging, so it’s best to lower dab count as much as possible, since that makes your brush more efficient and is less likely to disrupt other people on the same canvas.
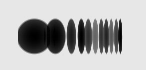
If you made a pattern brush and it seems like it needs more dabs there are ways of making up for missing dabs, which is increasing the radius of dabs, if they’re too big and you want straight lines you can use Elliptical dab: ratio Elliptical dab: angle to make the dabs thinner.
- Tracking
- Tracking noise
- Slow tracking per dab
Tracking noise doesn’t have any dynamics, but you can affect it using dynamic inputs using Slow tracking per dab (which has dynamic inputs).
- Smudge
- Smudge
- Smudge length
- Smudge radius
- Smudge length multiplier
- Smudge bucket
- Smudge transparency
You can set smudge with pressure dynamics to mix colors if you’re pressing hard or to apply colors if you’re pressing lightly. A negative value Smudge transparency will not allow dabs to draw on any pixels. Smudge parameters don’t work if Smudge is set to 0, you can make them work by setting Smudge to 0.1.
- Color
- Change color hue
- Change color lightness (HSL)
- Change color satur. (HSL) (Saturation)
- Change color value (HSV)
- Change color satur. (HSV) (Saturation)
Random GridMap and Stroke dynamics are neat to use with color parameters.
Do pay in mind the color you have selected affects how the colors will come out.
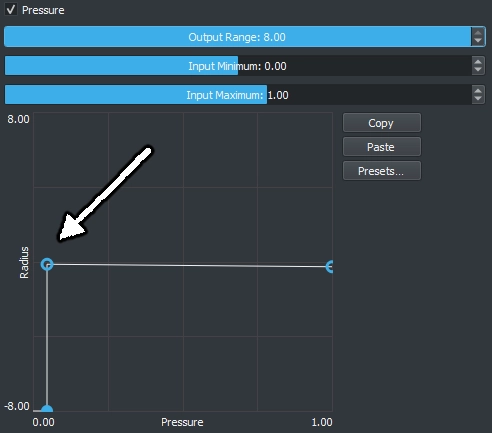
You can get specific values if you use curves right. Horizontal lines will stay the same. Vertical lines won’t be seen. With experimentation you can map out where the values are in the curve. The middle is usually the normal value, if not you probably changed the base value.

- Offset
- Jitter
- Offset by speed
- Offset by speed filter
- Offset Y
- Offset X
- Angular Offset: Direction
- Angular Offset: Ascension
- Angular Offset: View
- Angular Offset Mirrored: Direction
- Angular Offset Mirrored: Ascension
- Angular Offset Mirrored: View
- Angular Offset Adjustment
- Offsets Multiplier
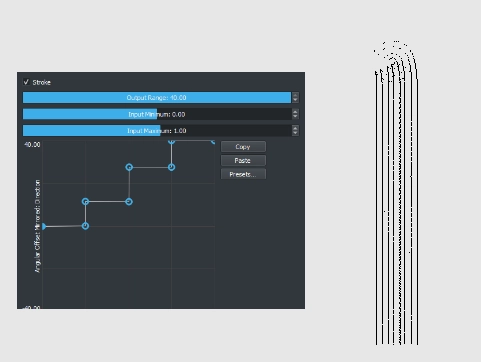
If you increase Mirrored offsets: Direction base value it will give you another extra line.
To get more lines, you can use a Stroke dynamic with a staircase curve to add more lines. Make sure that Stroke duration is low (like 0.30) to get this effect.
You can also get this effect just using the random dynamic with a staircase curve.
- Masks
- Eraser
- Lock alpha
- Colorize
- Posterize
- Posterization Levels
Posterize doesn’t work without Posterization Levels value being low.
Lock alpha is useful with smudging when you want to blend colors.