What's New in 2.3.0
Drawpile 2.3.0 has lots of new features over versions 2.2.x. It is still backward compatible though, meaning you can use the new version and still draw with people using the previous one.
To install it, take a look at the release announcement or go straight to the downloads page to grab and install it.
Below is an illustrated guide showing off most of the new features in this version.
- Compatibility
- Layer Clipping
- Explicit Inherit/Preserve Alpha
- Blend Mode Dependence
- Layer Alpha Lock
- Anti-Overflow
- Gradient Tool
- Lasso Fill Tool
- Drawing Toolbar Customization
- Selections Masking Brush Strokes
- Drawing on Selections
- More (and Fewer) Layers
- Bigger (and Smaller) Brushes
- Larger Canvases
- Layer and Key Frame Color Markers
- Paint Modes
- MyPaint Brush Blend Modes
- New Blend Modes
- Blend Mode Shortcuts
- Selection Action Bar
- Better Lock and View Mode Status
- Animation Timeline Additions
- Pixel-Perfect
- Pixel Art Input
- Synchronized Smudging
- Smudge with Transparency
- Jitter Brush Setting
- Binary Transform
- Color Harmony Swatches
- Annotation Rendering
- Better Annotation Box Background
- Ctrl+D and Escape to Deselect
- Switch Tool and Deselect
- More Layer Locks
- Layer Blocking
- New Faster File Format
- Small-Screen Mode Improvements
- Chat Enhancements
- Native Windows on ARM Support
- Fast Reconnects
- More Stable Sockets
- And More
Compatibility
Drawpile 2.3 is backward-compatible with Drawpile 2.2.
That means 2.3 can join sessions hosted with the older 2.2 versions and you will be able to use several of the new features from the later version. Not everything will be available though, simply because the older version wouldn’t understand it and would desynchronize. In the other direction, the older 2.2 version can’t join sessions hosted with the new 2.3 version.
If you want to use both versions side by side, take a look at this help page.
Feature Tags
Features are tagged with 2.2-compatible if they are available in sessions hosted with the old 2.2 version, 2.3-only if they’re only available in sessions hosted with the new 2.3 version.
Layer Clipping 2.3-only
You can now enable “clip to layer below” to make a layer or layer group preserve alpha with what’s below it. This type of clipping is also now saved to and loaded from PSD files. It is also saved correctly in ORA files and will survive editing in Krita.
This doesn’t really add any new functionality, since you could already do this kind of clipping by creating a layer group and setting the blend modes appropriately. It’s just there for artists who are used to this flavor of alpha preservation and for compatibility with PSD files.
The old behavior or making alpha preserve dependent on blend mode is still there, but you can turn that off if you don’t like it.
Explicit Inherit/Preserve Alpha 2.3-only
Similarly to the above, you can now explicitly toggle “inherit alpha” on layers and “preserve alpha” on tools. This is for artists used to Krita and will be saved to and loaded from ORA files appropriately.
The old behavior or making inherit and preserve alpha dependent on blend mode is still there, but you can turn that off if you don’t like it.
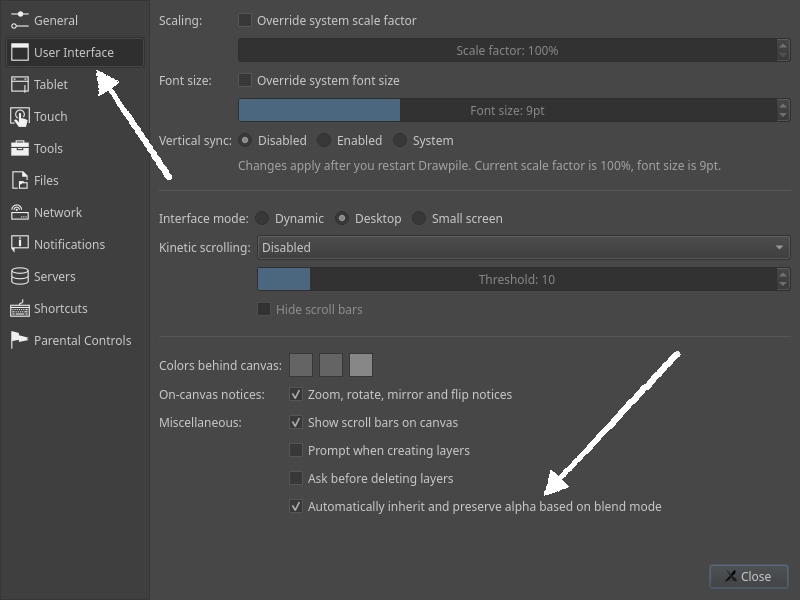
Blend Mode Dependence 2.3-only
By default, Drawpile toggles “inherit alpha” on layers and “alpha preserve” on tools depending on the blend mode you choose. This is probably usually what you want, since not enabling it gives you a weird amalgamation of your chosen blend mode and Normal.
However, if that messes with your head coming from other programs, you can turn it off via Edit → Preferences, under User Interface via the option Automatically inherit and preserve alpha based on blend mode. The setting is also linked in the Layer menu at the top and in the menus of any dock that lets you pick a blend mode.
Layer Alpha Lock 2.2-compatible
You can now alpha-lock a layer to make tools preserve alpha on them. This only affects you drawing on it, it doesn’t mess with anyone else using the same layer.
This effectively the same as changing your tool’s blend mode to preserve alpha. The feature is just there for artists that are used to other programs doing it this way.
Anti-Overflow 2.3-only
Brushes now let you enable anti-overflow, letting you draw “within the lines” of another layer.
To use it, enable it on your brush, then set your lines layer as the fill source. Then switch to your colors layer and draw there.
Similar to the fill tool, you can adjust the tolerance and expand settings here to let your fills push into the lines.
Gradient Tool 2.2-compatible
There is now a Gradient tool, letting you make linear and radial gradients. To avoid smattering gradients over other people’s drawings on the same canvas, the tool requires a selection to operate in, giving you shortcut buttons for the common actions of selecting the entire canvas or the area of the current layer.
Lasso Fill Tool 2.2-compatible
There’s now a new “lasso fill” tool. It works similar to performing a lasso selection and then filling it, except that it fills directly. It also lets you use the same stabilization options as for brushes, letting you make smoother shapes.
Drawing Toolbar Customization 2.2-compatible
Since the drawing tools toolbar is getting kind of long at this point, you can now configure which tools you want to have on it and in what order they show up in. This is particularly useful if you have a smaller screen and the size is throwing one of your more frequently-used tools into the fold-out area.
The configuration option is under Tools → Configure drawing toolbar, under View → Toolbars and when right-clicking a toolbar.
You can always access any tool via the Tools menu at the top or via keyboard shortcuts, even after you hide them from the toolbar.
Selections Masking Brush Strokes 2.3-only
Selections will now mask brush strokes, like they do in pretty much every other program, letting you “draw inside selections”.
If you want the brush to disregard your selection, you can toggle Selection → Mask Strokes/Lasso Fills by Selection.
Drawing on Selections 2.2-compatible
You can also now draw on the selection masks themselves, letting you create a mask by using your brush. To do so, toggle Selection → Draw on Selection.
It will also automatically turn itself off again when you switch layers.
More (and Fewer) Layers 2.3-only
The layer limit has been raised from 255 per user to up to (theoretically) 32767 per user. By default, the limit is set to 1000.
There’s a new session permission setting to adjust these for the different roles, available in the Host dialog or under Session → Settings, both at the bottom of the Permissions tab. For public sessions, it can make sense to set this limit to a very low number, rather than the typical old way of only letting people draw on pre-created layers.
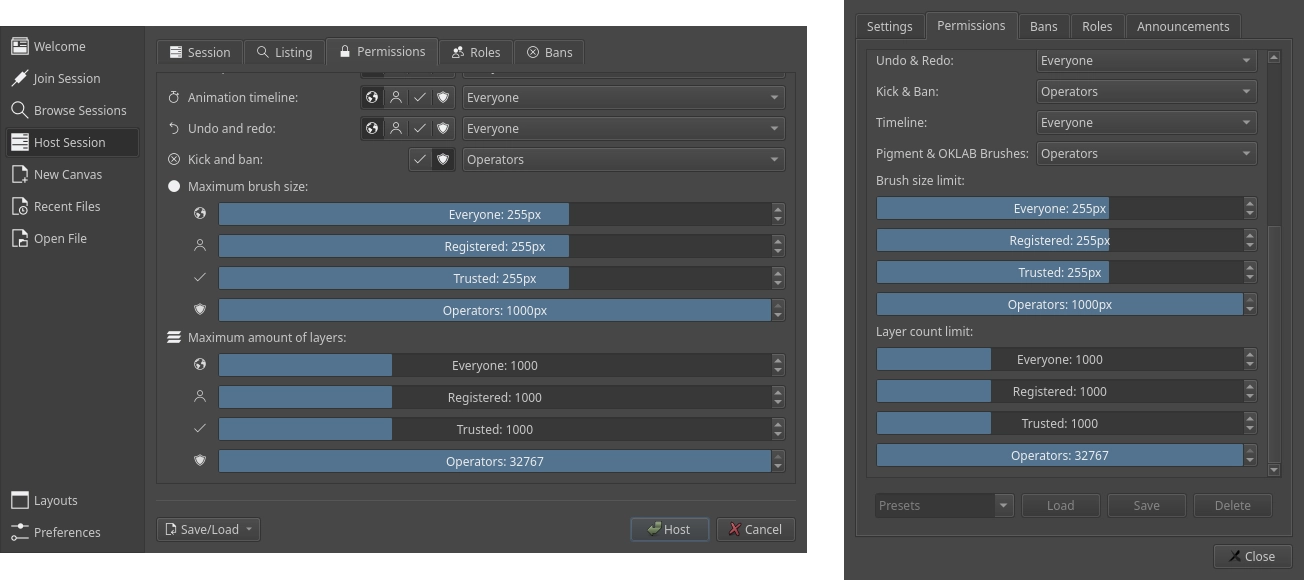
Bigger (and Smaller) Brushes 2.3-only
The maximum brush size has been increased to 1000 pixels in diameter, up from 255. That lets them cover almost 16 times more area than before, the video below illustrates how much of a difference it makes.
Since huge brushes like this can be disruptive, there’s a new session permission setting to limit it, right above the one for layers. By default, the limit is 1000 for operators and 255 for everyone else. If you run a public session, you may want to reduce the size further for the sake of performance and to keep drawings small.
Larger Canvases 2.3-only
You can now have canvases that are up to 1 million pixels in either direction, rather than being limited to 32,767. The total size (width times height) is still 1,073,676,289 pixels (i.e. 32,767 squared), it’s just that the sides are no longer capped individually.
If you’re working at such sizes, you’ll probably want to expand your canvas downwards or rightwards, since those are much faster than left and up. Also note that JPEG, WEBP and PSD images have a lower limit than these. Oh, and other programs will probably struggle opening images that are overly huge.
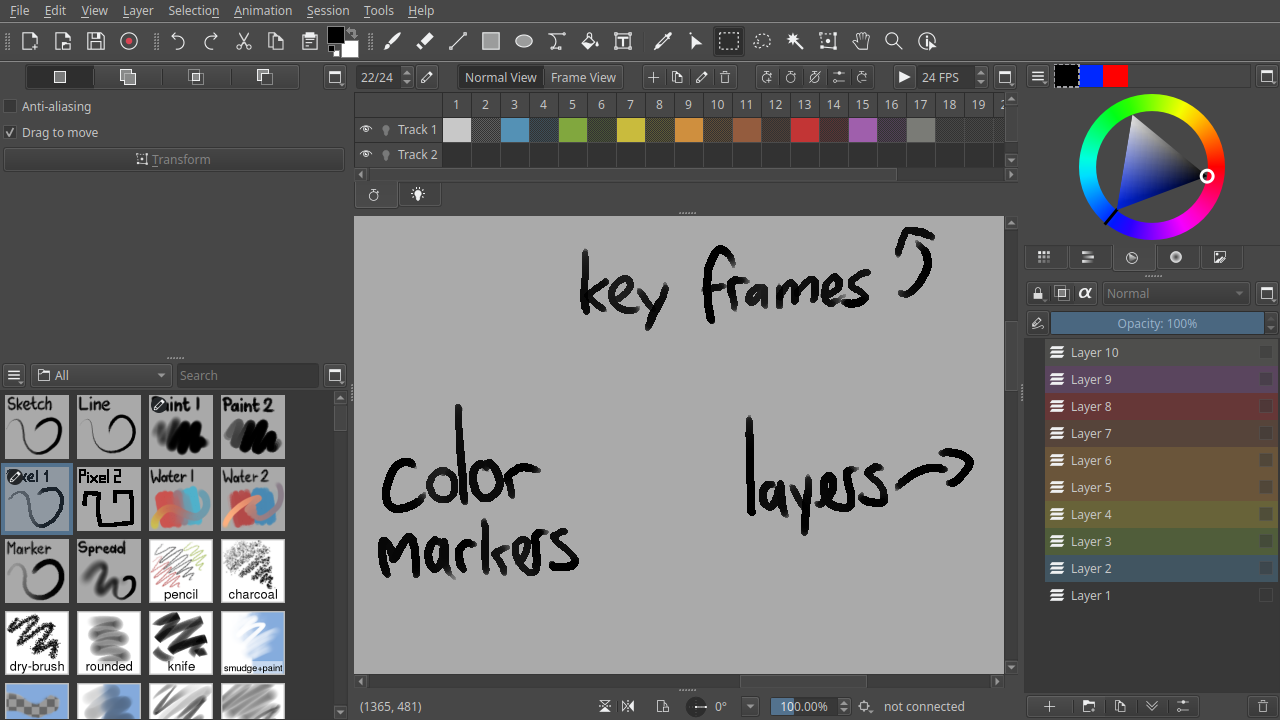
Layer and Key Frame Color Markers 2.2-compatible
Layers and key frames can now be marked with a color to help you spot what’s what. You can set these in the layer and key frame properties, via the top menu or by right-clicking on them.
The color tag is actually stored in the title of the layer or key frame, starting with a #, then the hex code of the color and then a !. For example, the red Layer 8 in the picture below is actually called #c23535!Layer 8. That means if the available set of colors isn’t enough for you, you can manually enter a custom color this way. It also means that when you edit an ORA or PSD file in another program and then go back to Drawpile, the color markers will survive.
Paint Modes 2.3-only
There is now four different paint mode options:
- Direct Build-Up will directly put the brush onto the canvas, letting opacity compound. This is also known as “Flow” in some programs.
- Indirect Wash will only build up opacity to the maximum opacity of the stroke. This works like Wash in Krita.
- Indirect Soft works like the indirect mode in Drawpile 2.2 (which was incorrectly named “Wash”), which will not build up any opacity within the same stroke at all. This is useful for soft shading, but can make odd-looking shapes when you cross lines with them.
- Indirect Build-Up is like indirect mode in Drawpile 2.1 and earlier, which just caps the opacity of the current stroke, as if you created a layer with the opacity you picked and then merged it.
MyPaint Brush Blend Modes 2.3-only
You can now use any blend mode with MyPaint brushes, like you can with the other engines.
Some more obscure features won’t be available if you pick irregular modes, such as posterization or intermixing multiple modes. But since they don’t really make sense when you’re using those other modes, you probably won’t miss them.
New Blend Modes 2.3-only
Several new blend modes have been added. Some of them are “just” more modes to do lighting and shading with, but several of them also give new ways of color mixing and controlling brush opacity.
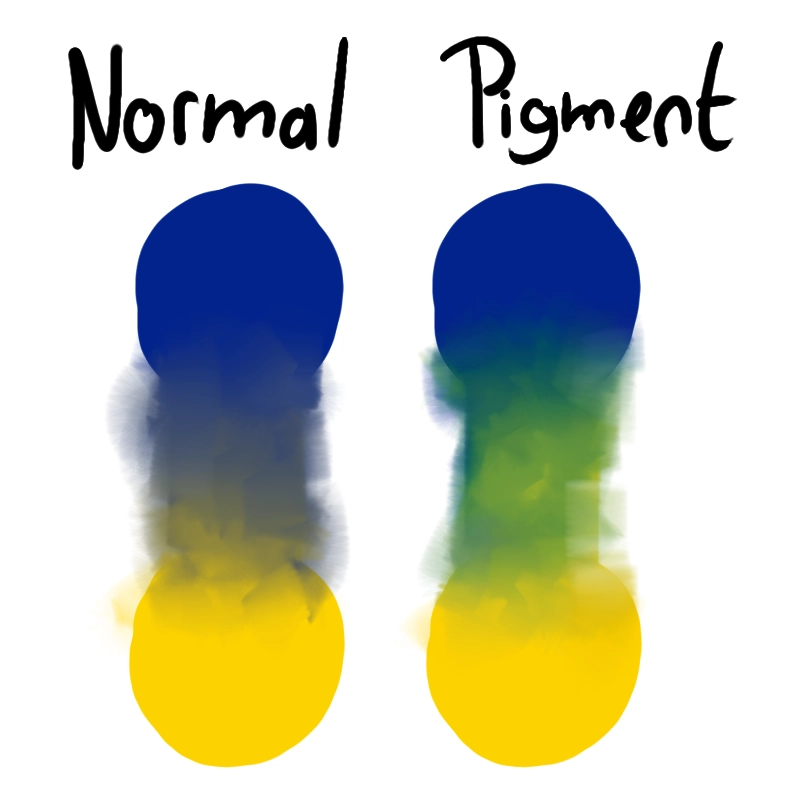
Pigment Blend Mode 2.3-only
The Pigment blend mode allows for more “realistic” color blending. Instead of just averaging the red, green and blue channels, it performs spectral color mixing. Below you can see an example of how it blends blue and yellow into green, rather than them turning into gray.
Since this blend mode can be somewhat heavy on performance when used for brushes, there is a session permission for it. Only operators are allowed to use the mode by default. For layers, there is far less calculations, so there the mode is always available.
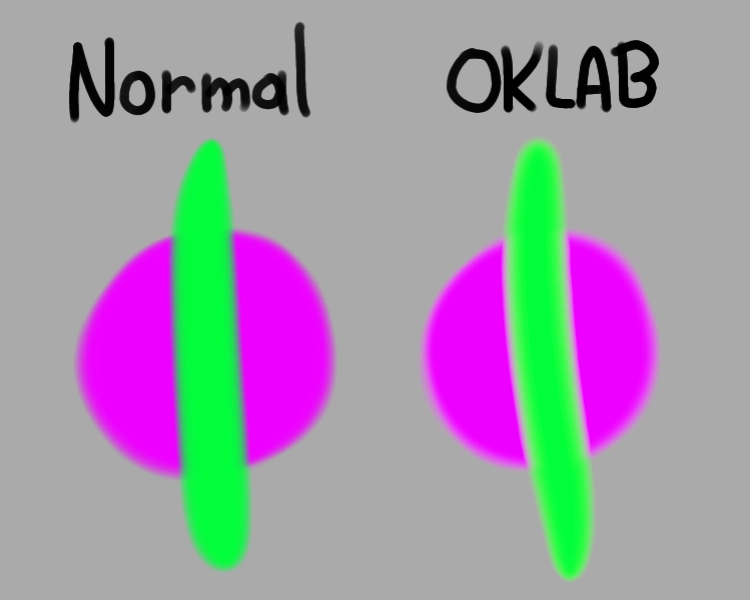
OKLAB Blend Mode 2.3-only
The OKLAB blend mode does color mixing in the OKLAB color space. Instead of operating directly on the red, green and blue channels, it instead performs its calculations in a space that’s more perceptually correct.
In the picture below, you can see an example of how Normal mode gives a bit of a dark halo around the spots of color, whereas OKLAB has them even throughout.
For brushes, this mode is behind the same permission setting as the Pigment mode, since it can be relatively slow. For layers, no special permission is needed.
Greater Density and Marker Blend Modes 2.3-only
These two modes work similarly to each other: they don’t compound opacity with what’s already on the layer.
Greater Density works like “Greater” in Krita and similar to “Compare Density” in CSP if it had proper color mixing. It will only put down something if your brush stroke has a higher opacity than what’s already on the layer, otherwise it will not alter the picture.
Marker works like the marker tool in Paint Tool SAI and similar to “Alpha Darken” in Krita if, again, it had proper color mixing. It will only increase the opacity if your brush stroke has a higher opacity than what’s already on the layer, but will always mix colors normally. Supposedly this is similar to how alcohol-based markers let you push color through the paper.
If you use a single color with these two modes, they work the same as each other. Try them out for linework!
SAI Blend Modes 2.3-only
Drawpile already had the mode “Luminosity/Shine (SAI)”, which has now been renamed to Shine (SAI) to match with how Paint Tool SAI version 2 calls it (and because the name makes more sense.)
Additionally, there’s now Shade (SAI), Shade/Shine (SAI), Burn (SAI), Dodge (SAI), Burn/Dodge (SAI), Hard Mix (SAI) and Difference (SAI) modes. These modes tend to produce more vivid or even “blown-out” colors than other modes do.
These modes will correctly save to and write from PSD files, so you should be able to exchange them with Paint Tool SAI that way.
Common Blend Modes 2.3-only
Some less exciting new blend modes are Vivid Light, Pin Light, Difference, Darker Color and Lighter Color. These modes probably aren’t spectacularly useful, but they’re very common in other programs, so Drawpile has them too now.
Blend Mode Shortcuts 2.2-compatible
You can now assign shortcuts to switching your current tool to a specific blend mode. Probably particularly useful for common modes like Behind, Marker or Pigment.
Selection Action Bar 2.2-compatible
When a selection is active, a new selection action bar will appear. By default it’s in the bottom-left, but you can pick a different place for it if you prefer (or turn it off altogether.)
One reason the bar is there is so that you can tell you have a selection active. This prevents forgetting about a selection that’s off-screen and not being able to draw.
The other is to give access to common actions, deselect in particular. If you don’t have a keyboard, this cuts out the annoying extra click of going into the View menu or having to switch to the selection tool to get rid of a selection.
When transforming, the bar contains transform actions instead, since you can’t manipulate selections during it.
Better Lock and View Mode Status 2.2-compatible
The on-canvas lock notice will now show buttons to resolve the lock if appropriate, rather than making you hunt through the UI to find where to do it. For example, if the canvas is locked and you are an operator, you’ll get a button to unlock it. Or for the new anti-overflow feature, you will be prompted to set a layer as the fill source or disable the mode.
Drawpile will also now indicate when you’re in layer or group view here, with a button to get out of it. If you don’t like that indicator, you can disable it. When animating in frame view mode, the prompt to exit it will show up when you switch to a layer that’s not visible in the current frame.
Animation Timeline Additions 2.3-only
The timeline now lets you adjust the frame range of animations by dragging the handles at the top. It also no longer cuts off at the last frame, instead letting you move stuff beyond the end. You can also double-click the row of frame numbers or click the button at the top-right to edit the range directly.
You can also edit the framerate (FPS) here, which allows fractional numbers now. The flipbook button has moved to the left and given a more obvious “play” label.
Double-clicking on an empty frame is now a shortcut for creating an empty key frame there, rather than having to hunt for the button at the top. When you select a blank key frame that’s not assigned to any layer, your layer selection will be cleared to avoid drawing on the wrong layer.
Interacting with key frames to a sufficient degree now switches you to frame view mode automatically. You can use the buttons at the top of the timeline to get out of frame view or switch to a layer that’s not part of the current key frame and use the prompt that shows up on the canvas.
You can now increase and decrease the key frame exposure of all visible tracks at once, rather than having to do it to every track individually.
Finally, canvases also now start with an empty track, just like they start with an empty layer.
Pixel-Perfect 2.2-compatible
There’s now a “pixel-perfect” setting for the Drawpile pixel brushes and MyPaint brushes. The setting is available either in the paint mode drop-down at the top-right of the brush settings dock or in the brush settings dialog.
This is mostly useful for single-pixel brushes to keep their thickness at actually a single pixel, without adding two pixel wide, L-shaped jags when doing curves. You can also enable it for larger brushes, but not sure if that has a notable effect.
For MyPaint brushes, enabling pixel-perfect will force the Hardness and Snap to Pixel settings to 100%, as well as the Pixel Feather setting to 0%, since those are what make a MyPaint brush a pixel brush.
Pixel Art Input 2.2-compatible
Drawpile normally does a bunch of processing to your inputs: it smoothes out inputs received from the tablet, connects the received positions with a proper curve, applies brush stabilization and disregards any jitter that happens at a sub-pixel level. Without it, brush strokes would come out looking pretty wavy and jaggy.
However, if you’re doing pixel art and want to poke at individual pixels directly, all of that just gets in the way. Of course you can turn most of this stuff off in the preferences, but that makes switching between the two annoying.
So now you can enable “pixel art input” for round and square pixel brushes. It will turn off all the stuff meant for regular brush strokes and instead just immediately put down the brush wherever you’re pointing. And it will only apply to the brushes you want to use for pixel art, without having to adjust your global settings.
This will mix correctly with the pixel-perfect setting. That is, it will still delay putting down the stroke until you’ve moved at least two pixels, to avoid creating doubled-up lines and L-shaped jags.
Synchronized Smudging 2.2-compatible
You can now enable synchronized smudging on brushes that require smudging with their own strokes. Without it, some brushes will have discontinuity when you make fast strokes with them, since they try to smudge with something that isn’t there yet.
Enabling this setting on a brush will make it significantly slower, since it has to wait for its own strokes to finish before continuing, but it’ll probably still be faster than manually slowing your pen motion down.
Smudge with Transparency 2.3-only
The soft round, round pixel and square pixel brush engines now let you enable smudging with transparency. This makes them work like MyPaint brushes and smudging in pretty much any other program do, supporting “real” smudging that drags around the alpha channel as well.
The old way that doesn’t touch the alpha channel is still available. You’ll know the brush is falling back to it if the slider says “Blending” instead of “Smudging”.
Jitter Brush Setting 2.2-compatible
The soft round, round pixel and square pixel brush engines now have a jitter setting. This will cause the brush dabs to randomly spread out around your cursor, useful for making charcoal, spray can or pencil brushes.
The MyPaint brush engine already had this setting and it continues to work like it did before.
Binary Transform 2.2-compatible
There’s a new interpolation mode in the transform tool called “Binary” now. It’s meant for art drawn with hard-edged brushes.
The way it works is that it smoothes out the image, but keeps hard edges intact and colors the same. So it should end up with less jagged edges than Nearest, but not make your binary-brushed art look blurry like Bilinear does.
Color Harmony Swatches 2.2-compatible
The color wheel now lets you enable color harmony swatches underneath it, similar to how it works in Krita.
By default, they show adjacent hues along with two sets of shades, one set having less saturated shadows and more saturated highlights and the other going vice-versa. Clicking on a color will select it so that you can make a palette, double-clicking will also make it the new baseline color. You can configure these swatches to your liking in the same menu that you use to enable them.
Annotation Rendering 2.3-only
Annotation rendering can now be switched between Vector, Smooth and Pixel. Vector is the old way, where annotations are vector objects. Smooth shows the annotation the way it would look like if you merged it into the canvas. Pixel uses aliased text, which also looks the same when you merge it.
Better Annotation Box Background 2.2-compatible
The annotation tool settings will now use either the canvas background or the color behind the canvas as the transparent background color for the text input field. Previously, it would always be white, which was pretty annoying when writing light text.
Ctrl+D and Escape to Deselect 2.2-compatible
By default, Ctrl+D is now bound to deselect, like it is in several other drawing programs. This is in addition to the Ctrl+Shift+A, which is the standard deselect shortcut in most other programs.
You can also hit Escape to deselect now, if there’s no other action to cancel. If you don’t like that, you can disable it via Edit → Preferences, under Tools via the option Press Esc to deselect. Actually, the key can be different, it’s just whatever you bound the “cancel action” shortcut to.

Switch Tool and Deselect 2.2-compatible
In other deselect news, there’s shortcuts to switch tools and deselect at once, just search for “and deselect” in the shortcut preferences. This is useful if you want your selections to automatically go away when you switch to the brush tool for example, like it worked in Drawpile versions before 2.2.
More Layer Locks 2.3-only
You can now not only lock the content of a layer, to prevent someone drawing on it, but also the position in the tree, to prevent it from being reordered, and its properties, to prevent changing names or blend modes or whatever. And you can also set all of these at once if you want to lock a layer entirely.
Layer Blocking 2.2-compatible
If there’s something on a layer you don’t want to see, you can now block it for yourself. This is similar to censoring the layer, in that it will replace its contents with a bunch of striped rectangles, but only for you instead of for everyone.
This is usually better than hiding the layer because you’ll still be able to tell where stuff is drawn on that layer and avoid drawing in the same space.
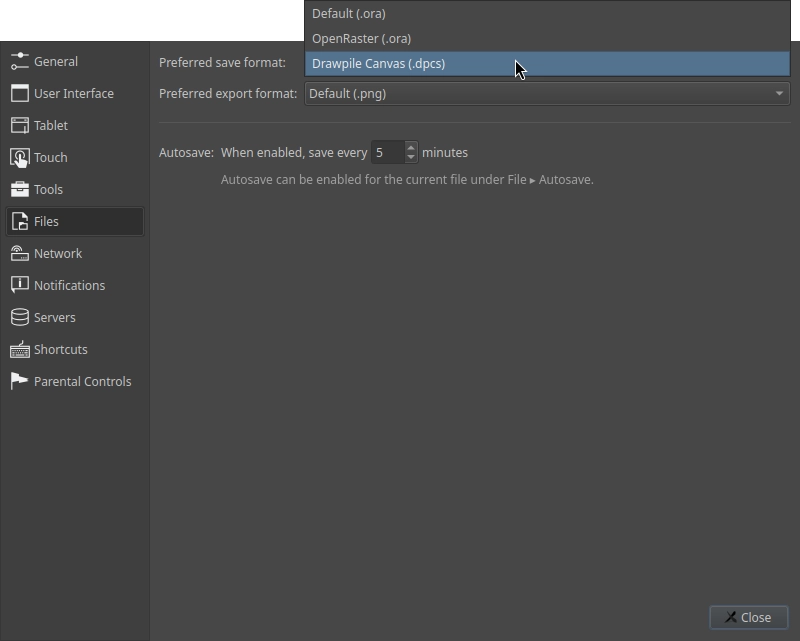
New Faster File Format 2.2-compatible
There’s now a new DPCS file format that is much faster - and in many cases also smaller - than ORA files. ORA continues to be available of course.
The speedup is pretty huge, around 3000% faster to save and 200% faster to open. On the low end that is, some more pathological files are even faster, files that used to save in 2 minutes now take 2 seconds.
Or, if you want another comparison: saving the canvas in DPCS with all the layers, annotations and timeline in it is usually faster than exporting a flat JPEG.
Currently, ORA is still the default format. You can change the default via Edit → Preferences, under Files via the Preferred save format option. Here you can also now set a preferred export format, if you want something other than PNG.
Small-Screen Mode Improvements 2.2-compatible
If you use Drawpile on a phone or some other device with a small or low-resolution screen, you get a different user interface.
Under the View menu at the top, you can now enable left-handed mode, which will swap the sides of all docks and fold-out tabs. You can also toggle the side or bottom toolbar here now, if you don’t want them permanently visible.
Chat Enhancements 2.2-compatible
The chat now starts out hidden and only shows up when you connect to a session, since there’s not much point in having it present when you’re drawing offline. It also now remembers the size you had it at properly, rather than forgetting it when you hiding it.
There’s now a “Send” button, rather than requiring you to press enter to send. Mostly useful for on-screen keyboards that may treat the enter key weirdly.
On desktop platforms, you can detach the chat three ways now: as a regular window, always on top of Drawpile and always on top of everything. Android and browser versions still can’t pop out the chat.
Dice rolls using /roll are highlighted in blue instead of looking the same as a /me message, which makes cheating less trivial. The message can also now be translated to other languages, rather than always being in English.
Native Windows on ARM Support 2.2-compatible
Drawpile 2.3 is available for Windows on ARM-based devices. If you don’t know whether you own such a device: you probably don’t.
Before installing the ARM version, you’ll probably want to uninstall any existing versions of Drawpile for Intel-based devices first. Not doing so may give you strange results, but those should also be fixable by uninstalling and then reinstalling them. Your settings won’t be lost when you do this.
Fast Reconnects 2.2-compatible
If the server you’re drawing on has been updated, reconnects should now be faster by skipping the catch-up phase. Instead, you will only have to load what has been drawn since the time you disconnected. Especially on mobile devices that are prone to disconnecting very quickly, this should make things more comfortable.
You will also no longer be asked to enter your username and password again when you reconnect anymore, they will be remembered automatically.
More Stable Sockets 2.2-compatible
Drawpile will now try to use WebSockets for connections if possible, falling back to raw TCP if that doesn’t work.
One reason is stability. Some internet providers don’t treat TCP connections properly or block them outright, whereas WebSockets run over the same system that browsers do, which don’t get any of that interference.
Another is that it makes it easier to host servers. WebSockets have a lot of extra tooling available that server owners would like to use, such proxies or tunnels, but they don’t work properly for raw TCP connections. They also make encrypted connections easier, since it works the same as for other web applications, rather than having to set it up specifically for the Drawpile server.
You can tell which socket is being used by looking at the bottom-right corner of the status bar in Drawpile. If it says (ws), it’s using WebSockets, (tcp) means TCP. If you for some reason want to force Drawpile to connect via WebSockets or TCP, you can use the button with the three dots on the Join, Browse and Host pages and pick it explicitly. In the browser, there’s no TCP, so this option doesn’t exist there.
And More 2.2-compatible
And a bunch of other fixes, performance improvements and features, such as:
- Support for QOI, the Quite Okay Image format.
- The option to define a separate curve for your eraser brush tip, in addition to the regular pen tip.
- Moving the buttons on the toolbars in small-screen mode so that rounded corners on some devices don’t eat them.
- Small animations now get upscaled to fit into the flipbook preview.
- Arrow keys now let you navigate on the animation timeline.
- Brushes with a fixed X and Y offset now preview the outline in the correct place.
- MyPaint brushes now have a more accurate outline, as far as that’s possible.
- A faster compression algorithm, speeding up session resets.
- Remembering who made changes to tiles across resets.
- Edit → Lightness/Darkness to Alpha actions, for turning lightness or darkness into transparency.
- Fixed audio playback on 32 bit Windows, Android and the Linux AppImage.
- Support for using the eraser side of pens on Android.
- Better zoom quality in hardware renderer mode.
- Improved macOS support, including for Tahoe.
- Server management improvements, allowing per-session control over archiving and size limits.
- And even more, plus further additions to the server and tools.