What's New in 2.2.2
Drawpile version 2.2.2 brings a lot of new features compared to version 2.2.1. However, like the small version number change implies, everything is still fully compatible with the previous version. You can update to the new version even if the other people you’re drawing with haven’t yet.
To install it, take a look at the release announcement or go straight to the downloads page to download and install it.
The following is an illustrated guide showing off what changed in this version.
- Removing Autoresets
- Selections and Transforms
- Multi-Layer Operations
- Brush Improvements
- Tablet Support
- Better Fill Tool
- New Host Dialog
- Touch Gestures
- Animation Stuff
- Color Circle and Reference Docks
- Sketch Mode
- Color Schemes
- And Much More
Removing Autoresets
Sessions will no longer be disrupted periodically because of an autoreset. The canvas will be compressed on the fly instead, which doesn’t interrupt the session. Not only is this less annoying, it also uses less data, since the server no longer needs to send the entire canvas to everybody all over again.
This requires both the server to be updated to version 2.2.2 and the operators of the session to be on this version. So if either of those isn’t the case, you’ll still get interrupted and should ask the people in charge of the server and/or session to update their stuff.
Selections and Transforms
Selections you make are now persistent, rather than disappearing when you switch tools. That means you can add to or remove from an existing selection. There’s also a “magic wand” selection tool now, which lets you select contiguous areas similar to how the fill tool works.
The new Selection menu at the top also has some new items in there, like selecting the current layer bounds, turning the layer contents into a selection or letting you expand, shrink and/or feather (blur) a selection. What isn’t implemented yet is using selections as masks (“drawing within a selection”), since that would cause desync with older versions of Drawpile. So it’s something that will be coming in version 2.3.0.
Transforms have also been rewritten. You now explicitly start a transform by e.g. clicking on a selection or pressing the appropriate shortcut key, T by default. They no longer instantly deselect when you miss one of the handles, instead the outside area is now used for rotations and either a double-click or a tool switch applies them. If you just want to quickly moving a selected area, that still works as before just by selecting some stuff and dragging it elsewhere.
There’s now also some controls to change the opacity and blend mode of your transform, which is particularly useful if you want to paste a pattern in recolor mode or similar. You can also now switch the preview mode between fast, which is always on top like it was in earlier Drawpile versions, and accurate, which gets properly previewed on the layer itself. The fast mode is particularly useful when you’re transforming a lot of layers at once – which goes into the next point.
Multi-Layer Operations
You can now select multiple layers at once. If your device has a keyboard, you can do this by holding the Ctrl or Shift keys as you would normally. Without a keyboard, you can use the squares on the right side of the layer list.
This lets you transform multiple layers at once. When you select a layer group, you can transform that whole group. You can also change which layers you want to transform while you’re doing it by using the checkboxes on the right side of the layer list without having to restart the transform.
You can also rearrange, group, change permissions or merge multiple layers by selecting them and then performing that action, as you would expect.
Brush Improvements
Brushes will now remember changes to them by default, rather than resetting to their original state when you select a different one. Resetting the brush is now done explicitly instead. Your selected brush is now also shown in the tool dock. If you don’t like this behavior, you can turn off attaching brushes to slots again in the tool preferences.
In the tool preferences as well, you can now change how many brush slots you want to have, going up to 9 plus the eraser slot. You can also effectively remove the brush slots entirely by setting them to 1, which will instead just display buttons for the brush and the earser.
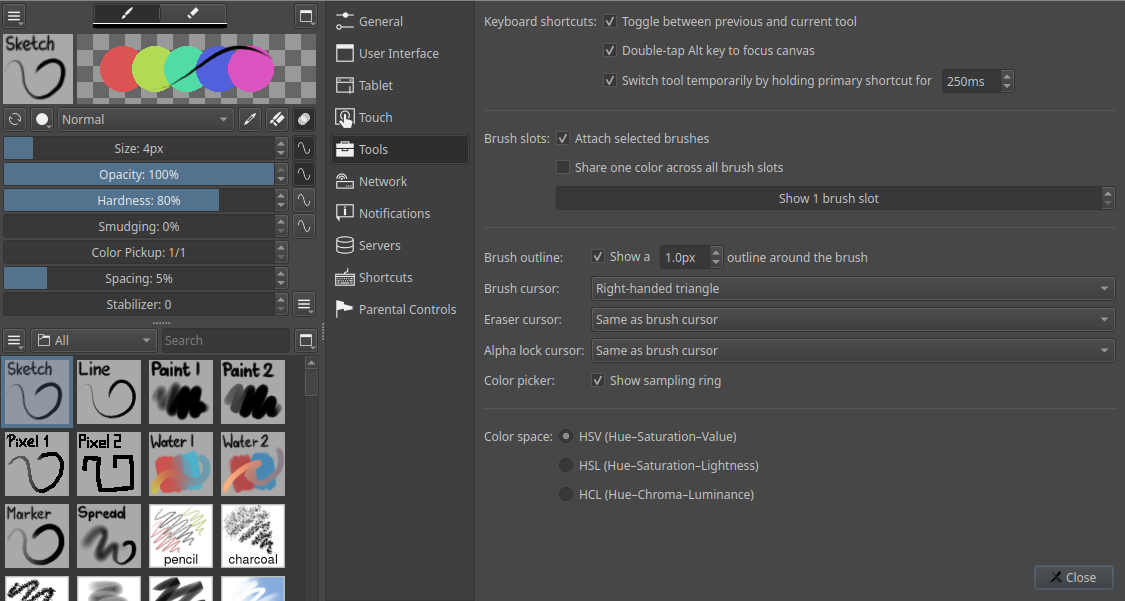
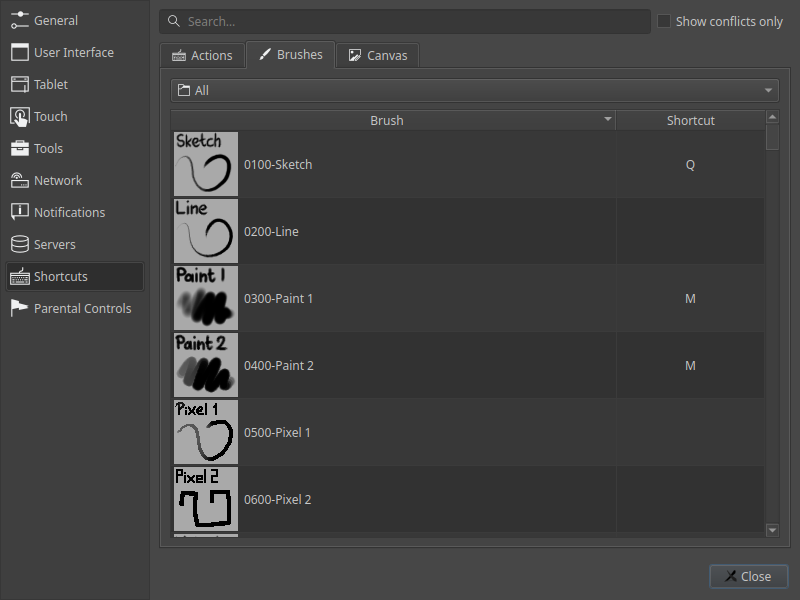
It’s also now possible to assign keyboard shortcuts directly to brushes. When you assign the same shortcut to multiple brushes, subsequent presses will select each of those in turn. There’s also shortcuts to select the next or previous brush in the current tag now, as well as selecting the next or previous brush tag, letting you navigate those with only the keyboard if you want.
There were also some issues with the brush engine and settings dialog fixed. Soft round brushes should no longer have problems with discontinuity at certain sizes, tilt detection should work properly on all platforms now and curves in MyPaint settings should remember their values and ranges correctly now.
Tablet Support
A lot of work has gone into working around numerous quirks and strange issues with various brands of tablets. Especially Huion and Gaomon tablets should work better. There’s also been some issues fixed with screen tablets that aren’t set as the primary monitor or that are using a different display scaling to the main monitor.
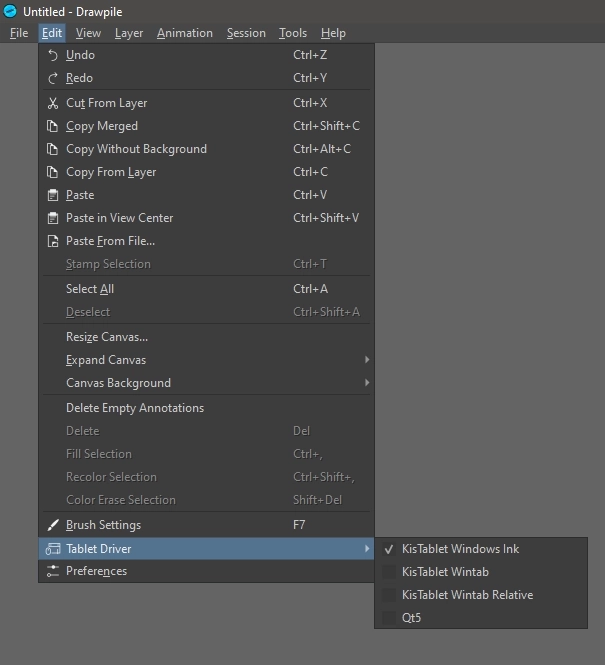
If your tablet doesn’t work properly right away on Windows, try the different options under Edit → Tablet Driver, one of those usually works. If not, take a look at the tablet setup and troubleshooting page.
Better Fill Tool
The fill tool now previews fills locally first, giving you a chance to undo if your fill accidentally spilled outside of its intended bounds without anyone else seeing the effects of it. Due to this, the size limit is now disabled by default, making the tool feel much more like it does in other programs, but still not “flashbanging” other users.
The tool has been optimized to run significantly faster. It now interacts with selections as well, meaning you can use those to limit the extent of a fill with any shape of your choosing, rather than being constrained to a rectangle.
You can also now click and hold, then drag the cursor left and right to adjust the tolerance until you find the right amount for your fill. That means you no longer have to undo, change the tolerance and then repeat the fill until you find the correct amount, you can just do it in one go.
There’s also the option of making the fill editable, letting you change the color, layer and all other settings before applying it. It’s not enabled by default just to match expectations and avoid causing confusion, but now that you’ve read about it, try turning it on to save many clicks and undos.
New Host Dialog
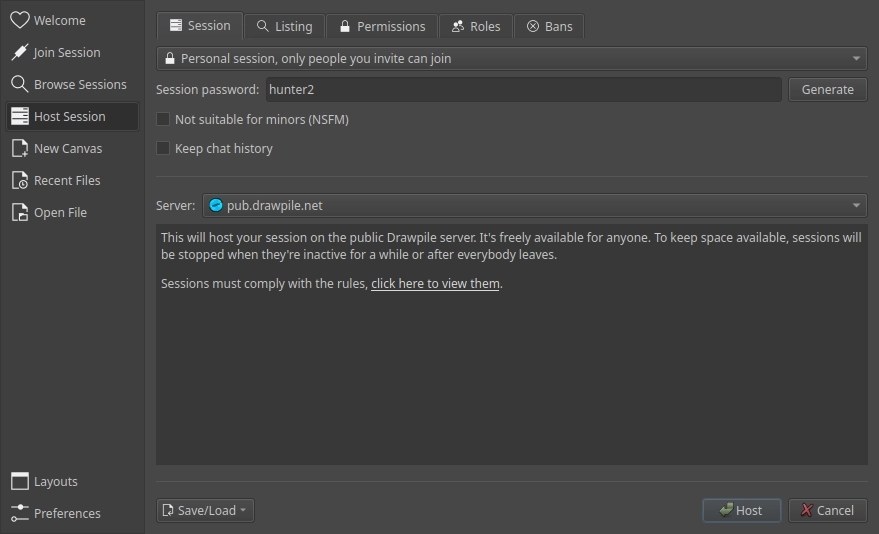
The session host dialog has been rejigged to make hosting a session less fiddly. By default, you now get a passworded session that just uses an automatic title, which should be what most people want, especially if they’re new to Drawpile.
If you want a more elaborate setup, you can now make most of that configuration in the host dialog, rather than having to host something incomplete and then editing the settings afterwards and undo limit afterewards. You can also save and load the settings you made in one go here, rather than them being a bunch of separate things you have to import.
In the future, the session settings dialog will probably also end up being combined with the host dialog, since there’s not really a reason why they need to look so different when they mostly cover the same settings.
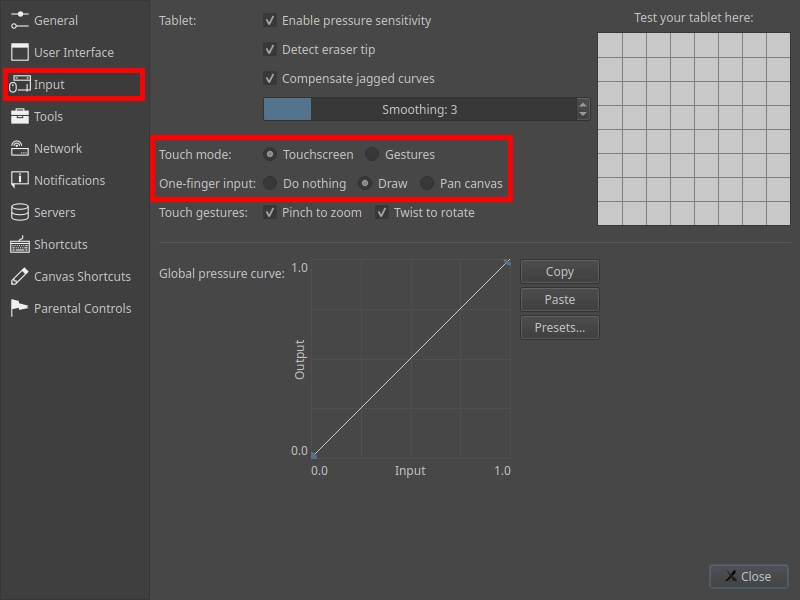
Touch Gestures
You can now do a two-finger tap on your screen to undo and a three-finger tap to redo. A four-finger tap will toggle the docks, showing only the canvas. Pressing and holding with one finger on the canvas will summon a color picker.
You can disable or configure these gestures under Edit → Preferences, in the Touch tap.
Touch zooming and rotation has also been improved to deal with weird devices and touch interactions when you lift and put down a finger again.
Animation Stuff
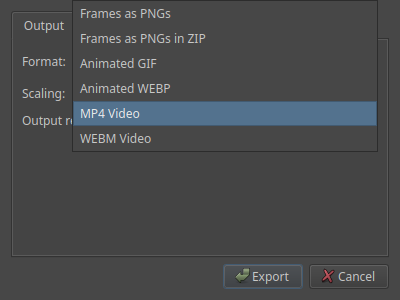
When exporting an animation, you get some more options to control the input and output now, such as letting you scale the result to a smaller or larger size. New supported formats are MP4 videos, WEBM videos and animated WEBP images. You can also export all frames as PNGs inside a ZIP file, which is useful for the browser and Android, where doing it as separate files isn’t available.
The GIF export has also been improved, it now runs significantly faster and produces better-looking results. It also supports transparent backgrounds now (as far as GIF goes anyway, a pixel is either fully transparent or fully opaque.)
Onion skins now use a different method of tinting that should work better for when you’re using them on colored frames, which no longer turn into fully opaque blobs. Also, when you create a new timeline keyframe, it will now base the structure that’s created on the previous key frame. So if you’re assigning layer groups to key frames, the next frame will be another group with the same structure.
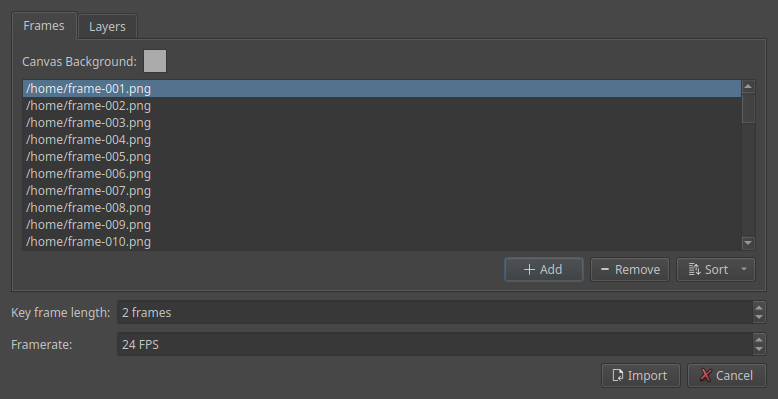
There’s also an animation import under File → Import now, which lets you turn either a collection of images or the layers of an ORA or PSD file into frames on the timeline.
Color Circle and Reference Docks
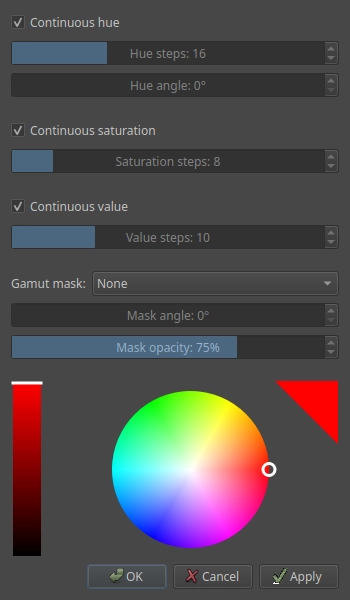
There’s a new color picker dock that presents its colors as a circle of hues and saturation, with the value being a separate slider. Krita calls this an “artistic color selector” but Drawpile calls it color circle because it’s a circle that’s got colors in it.
You can configure the values, hues and saturation to be presented in steps instead of as a continuous range. There’s also the option of putting a gamut mask on top of the dock. Limiting colors like this is sometimes used when doing paintings, since it makes for interesting results when you don’t have the full range of color to work with.
The reference image dock lets you load up an image, either from a file or by pasting one, and lets you pick colors from it. This is useful on platforms where you can’t pick a color from a different window. If you didn’t know that was a thing: it’s under Edit → Pick From Screen, assigned to the shortcut Shift+I by default.
This dock is currently still a bit bare-bones, but seemed to be useful enough to be worth including like this anyway.
These docks are in a tab together with the color wheel by default. If you don’t see them, you may have to turn them on through View → Docks.
Sketch Mode
You can now toggle “sketch mode” on a layer using the button next to the opacity slider. Doing this will bluescale the contents of the layer and reduce the opacity by default, since that makes it easy to line over and pretty obvious if you accidentally put lines on your sketch layer. You can change or disable the tinting and adjust the opacity either in the layers dock itself or in the layer’s properties.
Sketch mode is only visible to yourself, other people in the session continue to see the layer as normal. That makes it particularly useful when you don’t have permission to adjust the layer’s opacity or are sharing it with someone else and changing the opacity on them would disrupt their drawing.
The tinting also works if your drawing has an opaque white background, such as from scanning a physical picture or similar.
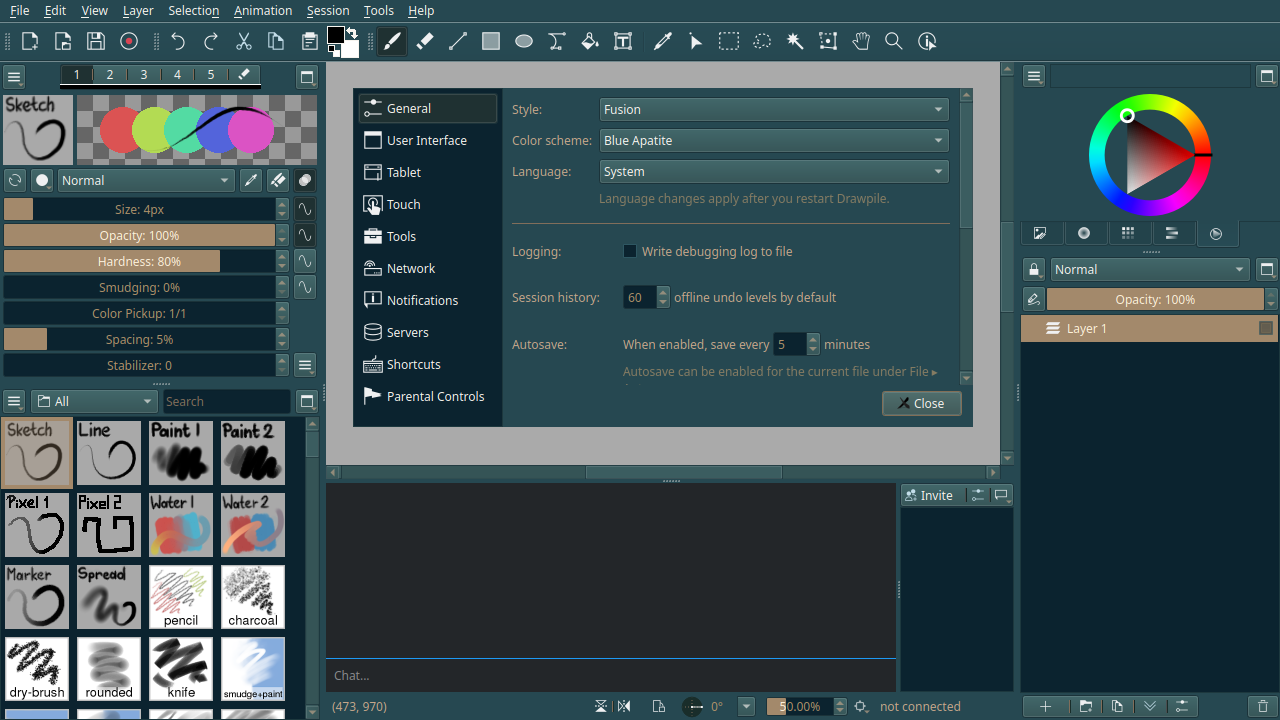
Color Schemes
There’s sevaral new color schemes installed by default, which you can enable in the general preferences.
And Much More
If you really want to know all the changes, you can look at the full changelog. But that’s very long, so here’s some highlights:
- Over 100 bugs have been fixed and many performance improvements were made. Things should run more stable and faster than before.
- A dual color button in the edit toolbar, letting you set and swap the foreground and background colors.
- You can disable any of the color history swatches on top of the color docks. This is particularly useful if you have multiple of them visible at once and don’t want to see the same swatch multiple times.
- The color sliders dock got a hex color input, as well as some extra settings as to which sliders you want to enable.
- Other people’s cursors now disappear when they get close to your own cursor, meaning you can draw in the same spot without the boxes getting in the way or having to turn them off altogether.
- Rotation now snaps around zero degrees. If you don’t like this, you can change the rotation in the shortcut and/or touch preferences to “free rotate” instead.
- The color picker now has an on-canvas preview, which you can toggle in the tool preferences.
- Clicking off of an annotation will no longer create a tiny one in that spot, instead it will just deselect it like you probably intended.
- Deselecting an empty annotation will automatically delete it now, hopefully preventing the “what are these weird rectangles” situation. If you want such an empty annotation back, hit undo and it’ll return.
- UI scaling is now enabled by default on most platforms, making Drawpile’s interface not really tiny on high-resolution screens. Fractional scaling should also work properly now.
- Group layer view mode, which will isolate only the group of the currently-selected layer into view.
- The default undo limit is now 60 instead of 30. You can still configure it however you want it to be per session and when offline of course.
- There’s now a hardware-accelerated canvas renderer, enabled by default on Android and the browser. You can enable it in the preferences, although it depends on your video card and drivers if this is faster, especially laptops with dual GPU can end up with input lag.
- You can now import MyPaint brushes in old version formats.
- Serializing the canvas has been sped up by a lot. This makes it faster to host, compress and reset it. It also no longer causes the application to chug when using the builtin server and someone new joins.
- Resizing the canvas with Ctrl+H/J/K/L now opens the resize canvas dialog instead of doing it immediately and causing everyone to chug. The keys still work in the dialog and auto-repeat now, so this should effectively mean less key presses overall.
- Drawpile can now open and export WEBP files.
- Invite codes on servers that support and allow it, letting you invite people without giving them the session password and bypassing usual join restrictions.
- A higher version number than ever before!